SDLC on ServiceNow
End-to-end SDLC guide for building, testing, and releasing ServiceNow apps using the ServiceNow SDK, Git, ReleaseOps, and CI/CD pipelines.
The modern approach to SDLC and Agile development
Table of contents
- Introduction
- Scope
- Overview
- Deep dive
- Appendix A- ReleaseOps setup
- Appendix B- Automating CI/CD pipeline for ServiceNow App Development
- APPENDIX C – Development Patterns
Introduction
The advent and increasing adoption of agentic software development and evolving ServiceNow tooling/products necessitates a prescriptive and opinionated SDLC model that customers can adopt to fully benefit from these advancements. This documentation aims to provide that model, as well as the on-ramps necessary for adoption.
Audience
-
Platform owners, architects, and development leaders (both internal and external)
-
Engineers seeking to understand the big picture
Purpose
-
Educate customers and advocates on ServiceNow products
-
Explain how ServiceNow products work together end-to-end
Scope
This documentation covers the end-to-end development lifecycle of apps on the ServiceNow AI Platform, from conception through production. In this model, an “app” is a persistent container, owned by you, for anything you build on the ServiceNow Platform. It has a name, a version and a scope. Apps may contain metadata you created yourself (net-new) or metadata of which you took ownership from elsewhere (known as customization or forking). This model is suitable for both self-contained apps and implementations of global out-of-the-box (OOTB) products like IT Service Management (ITSM).
NOTE: This model isn't currently suitable for in-place customization of metadata inside a non-global (scoped) application you don't own. For example, customizing a delivered business rule in a scoped app like CSM. That changed metadata has no persistent, customer-owned container and lives under ServiceNow’s ownership, therefore not meeting the definition of an app provided above. ServiceNow recommends using Build Agent for this use case in ServiceNow Studio.
In-Scope
-
App development
-
Global apps
-
Non-global apps
-
Global customization/implementation (“move and edit” semantics)
-
-
ServiceNow SDK
-
Source code as the authoritative source of truth
-
Fluent domain-specific language for defining ServiceNow metadata
-
-
IDEs
-
ServiceNow IDE/ServiceNow Studio (on-platform)
-
VS Code (off-platform)
-
-
Traditional source control
-
Git as the source of truth for app state
-
For branching/merging/conflict resolution
-
-
Agentic development
-
Build Agent (on-platform)
-
Claude Code, Codex, Cursor, etc. (off-platform)
-
-
SDLC products
-
Developer Sandboxes
-
ReleaseOps
-
CI/CD APIs
-
App Repo (“My Application Repository”)
-
-
Update sets
- Only for grouping units of work within a development (dev) instance
-
Testing
-
Test Agent (on-platform with Build Agent)
-
Standard UI (on-platform)
-
Claude Code, Codex, Cursor, etc. (off-platform)
-
Out-of-Scope
-
Application Engine Management Center (AEMC)
-
On-Prem/self-hosted instances
-
Instance cloning and related process
-
Legacy Studio (“Dev Studio”)
- Including the legacy source control (Git) integration
-
Non-global customization
- Use Build Agent on-platform
-
"Edit-in-place" customization
- Direct edits to non-owned metadata without “moving”
-
Update sets for:
-
Deployment between instances
-
Branching/merging/conflict resolution between developers
-
Source control
-
App customization
-
Overview
This section provides a high-level, end-to-end overview of the products and methodologies that ServiceNow recommends for achieving modern SDLC on the platform. The “what” of SDLC is covered here, and the following deep-dive section expands the “why” and “how” for each piece of the model.
Prerequisites
-
ServiceNow Otto for Creator (formerly Now Assist for Creator app) on-instance development
- If you are not licensed, you can download the Build agent trial app from the ServiceNow Store on your instance and avail 100 free user interactions for every 30 days.
Note: the trial app provides ATF authoring capabilities but does not support test execution from the conversation panel due to a dependency on ATF Cloud Runner. See Stage 2 for an alternative execution approach.
-
Developer Sandboxes
-
Check entitlements to confirm Developer Sandbox access on your development instances
-
If you are not entitled, raise a request for sandboxes by contacting your account manager to enable Developer Sandboxes by specifying:
-
Instance name
-
Licensed number of Developer Sandboxes
-
Current ServiceNow platform version on your instance
-
-
-
Configure ATF Cloud Runner – View setup instructions
-
ReleaseOps app setup – View setup instructions
-
Off-platform development (optional, can use the ServiceNow IDE instead)
-
IDE of choice (VS Code recommended)
-
Node.js + Node Package Manager (NPM)
-
Instructions https://docs.npmjs.com/downloading-and-installing-node-js-and-npm
-
Minimum Node.js version: 20.18.0
-
PNPM is a recommended alternative to NPM
-
-
Agentic AI tool of choice
-
Claude Code, Codex, Cursor, Copilot, Windsurf, or others
-
Stage 1 - Plan and build
1.1 – Plan
The plan and build section of this document assumes that you have completed the requirements documentation (creating epics and stories) for your project either on the ServiceNow platform using Strategic Portfolio Management (SPM) or off platform tooling such as Jira, Linear, etc. After completing this part, the planning stage discussed in this section takes your app or feature from idea to execution. It occurs primarily on your dev instance and (optionally) off-platform using your tools and methods of choice.
1.2 - Prepare
-
Create a new Git branch
1.3 - Code
-
Create or open the app in an IDE workspace
-
On-platform: ServiceNow IDE/ServiceNow Studio
-
Off-platform: IDE of choice, like VS Code
-
Scaffold the new app: now-sdk init
-
Convert an existing app: now-sdk init --from
-
Checkout from Git: git clone
-
-
-
Complete development tasks and write tests
-
Use one of the following options:
-
Write code by hand
-
Fluent code for ServiceNow metadata
-
JavaScript for business rules, REST APIs, UI actions, etc.
-
-
Use platform builders and sync to the code
-
Use platform tools for tasks best suited, such as Flow Designer
-
ServiceNow SDK can automatically update local source code with changes from the instance via the transform command
-
-
Leverage AI
-
On-platform: Build Agent
-
Off-platform: Claude Code, Codex, Cursor, etc.
-
-
-
Move metadata to customize
-
Take ownership of OOTB or third-party metadata
- Supported only in the global scope
-
-
Author ATF tests
-
Ask AI to write Automated Test Framework (ATF) tests for you (Build Agent, Claude Code, etc.)
-
Create tests on-platform through the ATF UI
-
Write tests in code using the ATF Fluent API
-
Keep tests in the application’s scope so they ship with the app
-
-
-
Validate the code
-
Get fast feedback from the SDK
-
Instant type-checking and diagnostics in your editor (VS Code, the ServiceNow IDE)
-
ServiceNow IDE: “Build”
-
Off-platform: now-sdk build
-
-
(Optional) Make your own rules
-
Static analysis (ESLint, Biome, etc.)
-
Pre-commit hooks
-
AI skills
-
Claude Code (off-instance, see extend Claude with skills)
-
Build Agent (on-instance, see deep-dive)
-
-
-
-
Iterate
-
Install changes to your dev instance
-
ServiceNow IDE: “Build and Install”
-
Off-platform: now-sdk install
-
-
Manually test and verify
-
Execute ATF tests
-
Continue coding if needed, repeat until complete
-
1.4 - Manage
-
Push changes to a Git branch
-
Submit a pull request when ready
-
Pull requests are submitted off-platform using your Git host of choice, such as GitHub/GitLab/Bitbucket/Azure Repos
-
Have your team review
-
Resolve conflicts before merging
-
Merge pull request
-
-
Not a Git expert?
-
AI can teach you
-
AI can do it for you
-
-
Publish pre-release version to the Application Repo
-
Navigate to your base instance (the instance that hosts your developer sandbox)
-
Pull the latest from your integration branch against which you merged your pull request earlier
-
Publish to Application Repo
-
-
Create a “Release” record in your ReleaseOps controller environment (typically production).
-
Define a “Deployment Request” for your ReleaseOps payload
-
Add Application Repo versions and plugins to a ReleaseOps deployment request
-
Decommission sandboxes once development is completed
Stage 2 - Test and verify
The second stage ensures your app or feature meets requirements and quality standards before release. It occurs primarily on your test/QE instance.
2.1 - Start quality control process
-
Ensure the Deployment Request Assessment is for a planned release on the production instance.
- In ReleaseOps, select “Ready to Assess” after the payload is defined.
-
ReleaseOps automation begins the assessment process, including Instance Scan, Deployment Analyzer, ATF, or other manual quality control, such as performance testing or User Acceptance Testing (UAT).
- These activities occur on the instances defined in the assessment process.
-
When quality control necessitates more building for reconciliation, revert the assessment to Draft manually and add more payload, then restart the assessment after it’s complete.
2.2 – Test in the environment
-
Functional testing: Execute all ATF test suites specific to the app scope or select the necessary tests inside the app scope if no designated test suite exists.
-
Static analysis: Execute Instance Scan checks to ensure policy standards and best practices are met.
-
Regression testing: Identify and execute adjacent ATF test suites or tests that guard overall application working logic to ensure new development doesn’t break existing functionality.
Note: if you are using the Build Agent Trial app, without the ATF Cloud runner, you can execute ATF tests using the scheduled client runner instead.
2.3 - Maintain suites
-
Inspect any existing ATF tests tied to the app scope and make updates as needed to ensure the test suite reflect the latest functionality.
-
Use the Test Agent in Build Agent to create, edit, and run ATF tests using natural language.
2.4– Troubleshoot
-
Use the Test Agent to triage any failures and fix the issues.
-
If new code is needed, restart the Deployment Request Assessment flow. See Reconciling a Deployment Request Task on the Doc site.
Stage 3 - Release and deploy
The third stage publishes your app or feature to the production environment for users to access.
3.1 - Release to prod
By this stage, ReleaseOps has completed the Assessment playbook and assuming the Deployment Request is Ready to Assess, the Deployment Request payloads will move to production.
-
On Demand releases will move payloads to production as soon as Assessment is complete.
-
Scheduled releases will move all Deployment Request payloads that are “Ready to Deploy” at the datetime scheduled.
Remember that ReleaseOps allows you to define both your assessment and release processes.
3.2 - Revert
If an app version must be reverted, you can roll back the installation within a fixed time window using the associated rollback context. This feature is only available when installing from the Application Repository.
Deep dive
Now that you have a high-level understanding of the products and methodologies that ServiceNow recommends for each stage of SDLC on ServiceNow Platform, you can dive into the details. This section will expand upon the “why” and “how” of each piece of the recommended model.
Stage 1.1 - Plan
Starting the planning process
Planning starts with requirements. Before any instance work, capture the app's scope as epics and stories, on-platform in Strategic Portfolio Management (SPM) or off-platform in Jira, Linear, or similar.
Writing requirements that work well for this model of development
In agentic development, your requirements are the raw input from which the AI generates the build plan. The quality of that plan, the tables and fields it proposes, the roles it defines, and the tests it designs, is bounded by the quality of the epics and stories you feed it.
A few practices measurably help:
-
Make the data model explicit. Name the entities, their key attributes, and their relationships, allowing AI to effectively glean tables and fields from what you describe.
-
State roles and access. Say who can do what, so access requirements are captured in the plan rather than left undefined.
-
Name integrations and constraints up front.
-
Point to existing structures you know of, for example "extend the existing Asset table, don't create a new one."
-
Write testable acceptance criteria in Given-When-Then form.
Anatomy of a well-articulated story with an example
✗ Vague: "As a plant manager, I want to manage maintenance requests so equipment stays running." Without entities, roles, or acceptance criteria, the AI guesses the data model, leading to potential rework and lost time due to mismatch in customer expectations and the actual implementation.
✓ Build-ready: "As a plant manager, I want to log an equipment maintenance request and assign it to a technician so that SLA-bound repairs are tracked to completion." This contains the necessary information for the next step of building.
-
Entities: Maintenance Request (equipment, priority, status, SLA due date, assigned technician); reference the existing Asset table for equipment.
-
Roles and access: Plant managers create and reassign any request; technicians view and update only requests assigned to them.
-
Acceptance criteria: Given a new Critical request, when it is saved, then set an SLA due date four hours out. Given a request assigned to one technician, when another technician opens it, then hide update actions.
-
Integrations: None.
-
Out of scope: Monthly reporting (separate story).
Standardizing story quality
ServiceNow recommends that you standardize your stories across your teams for consistency and scale. A lightweight pattern: Pull the draft story from wherever your requirements live, such as Jira, Linear, Azure Boards, or similar, and pass it through an LLM of your choice (or Build Agent on-instance) with a standing prompt that checks it against these criteria. Review the standardized stories to ensure they meet your best practice requirements.
Stage 1.2 - Prepare
Developer Sandboxes
Why use sandboxes?
Before starting development, ServiceNow recommends using and configuring Developer Sandboxes. Working in a sandbox ensures your development metadata changes are isolated from your peers’ development changes.
Agentic tools change many artifacts fast. On a shared non-production instance, concurrent edits to the same record are last-write-wins, so multiple developers running Build Agent against one app can silently overwrite each other. Sandboxes pair with source control to prevent this: each developer checks out their own feature branch in their own sandbox, all on one non-production instance, so a developer's metadata changes stay isolated and invisible to peers until pushed. Git then merges the isolated work back with review and line-by-line conflict resolution. Sandboxes contain the blast radius of agentic-speed change, and Git reconciles it.
Recommendation
The recommendation for how many sandboxes you need depends on the number of active developers, number of active applications, and how often they edit the same applications. Use Developer Sandboxes when multiple versions or branches of an application are being worked on by multiple people, or when you want to ensure isolation between users’ changes, such as safely enabling a user to build with agentic tooling like Build Agent. Changes against the same app in separate branches can all co-exist in different sandboxes simultaneously, connected to a single non-production instance. The standard pattern is as follows, one branch per environment:
-
One development non-production instance
-
Individual sandboxes for active development based on that non-prod instance
-
Test instance
-
Production instance
How to allocate a sandbox
-
On the non-prod instance, navigate to Sandbox Management > Sandbox Management Home.
-
-
Select Allocate Sandbox.
-
Provide a unique name for your sandbox.
-
Select Allocate.
-
-
After the sandbox has been allocated, navigate to the sandbox by selecting your sandbox name in the Sandbox Management Home Sandboxes table, or by accessing the URL provided to you by the admin.
Stage 1.3 - Code
This section explains how ServiceNow development happens in this SDLC model, and covers some of the historical context as well as tactical guidance for the modern world.
What is an app?
Before you write the first line of code or create the first piece of metadata, you need somewhere to put it. In this model, an “app” is a container for anything you build on the ServiceNow Platform. It has a name, a version, a scope, dependencies, and other properties that govern its behavior. Apps can contain metadata you created yourself (net-new) or metadata you took ownership of from elsewhere (known as customization or forking).
With this definition, apps cover the full range of development that occurs on the ServiceNow Platform, from implementation/configuration of global products like ITSM to standalone apps on the Store. The app model treats these development modes the same: one unified approach to planning, building, testing, and releasing apps, regardless of what a given app contains or how it's configured.
Quick note on non-global customization
Customization of non-global scopes doesn’t currently meet the criteria of an app as previously described, and therefore doesn’t yet fit cleanly into the source-driven, industry-standard SDLC model. The simplest explanation of the gap is that non-global customizations don’t have a persistent authoritative container that you, the customer, own. A “customization package” gets generated as an artifact of publishing, but this package is not an app; the customized metadata still lives within the original app on the instance. That is, you don’t own the app; you own fragments of an app owned by someone else. ServiceNow SDK projects must represent apps, not fragments.
Introduction to the ServiceNow SDK
Now that you know what an “app” is in this model, this section discusses how apps are represented in a source-driven world. The ServiceNow SDK provides a way to build ServiceNow apps by writing actual source code, the same way it’s done in other software ecosystems. Instead of pointing and clicking around an instance and exporting database records to XML, you write actual code in an IDE with an industry-standard experience. This piece completes the puzzle for modern development on ServiceNow: the SDK unlocks a meaningful source of truth (source code) that can be properly managed in Git, and enables your development process to benefit from powerful modern technology like agentic AI.
The ServiceNow Fluent language
The word “Fluent” is often used interchangeably with the ServiceNow SDK. For example, projects built with the SDK are often referred to colloquially as “Fluent projects.” However, “Fluent” actually refers to the TypeScript-based domain-specific language (DSL) invented to represent ServiceNow metadata as code, and is compiled by the SDK into deployable XML-based app artifacts. When building apps with the SDK, you define your metadata (such as table definitions, roles, ACLs, business rules, etc.) as Fluent code in Fluent files (with the .now.ts file extension) instead of XML.
Because Fluent is a TypeScript-based language, it is backed by a powerful type system that can catch errors instantly before they ever appear on an instance. The SDK also contains a robust processing framework built on top of the TypeScript compiler that provides even more advanced compile-time diagnostic feedback that can’t be achieved with types alone. These diagnostics can catch everything from a missing prefix in a role name to misalignment with best practices. You can leverage other TypeScript-compatible tools (such as ESLint) if you want to layer on additional rules.
JavaScript
With the SDK, your JavaScript code lives in actual JavaScript files instead of buried inside XML elements. That means you can write ServiceNow JavaScript using an industry-standard tool of choice. You can then import that JavaScript into your Fluent code to wire it up to your ServiceNow metadata, such as business rules or scripted REST APIs. You can even write business logic in TypeScript, or any other language that transpiles to JavaScript, giving you complete control over your codebase. As with Fluent code, you can leverage off-the-shelf linters like ESLint to catch issues at design-time before they reach your instance.
For server-side code, ServiceNow recommends organizing your JavaScript into modules, the modern, preferred approach in Fluent projects, which support import/export, typed Glide APIs via @servicenow/glide, code reuse, and third-party npm libraries; see the JavaScript Modules guide for patterns and constraints.
Front end
The ServiceNow SDK supports building a robust UI using industry-standard front-end frameworks like React, Svelte, Vue, Preact, Solid, and more. There are also official React components published for ServiceNow. Internally, the SDK uses UI Pages (sys_ui_page) to deliver standard HTML and JavaScript to the browser, enabling you to use whichever framework fits your team's skills and preferences, while the SDK handles the build pipeline automatically via its Rollup-based bundler, which you also have full control over and can replace if needed.
This process aids you in leveraging AI because LLMs understand popular frameworks exceptionally well out-of-the-box. Whether your team writes React TSX, Svelte components, or Vue SFCs, AI coding assistants can generate, refactor, and debug that code reliably. Thus, the power and flexibility offered by the ServiceNow SDK applies to both the front end and back end, providing freedom and control in your codebase. You build with the industry standard frameworks, tooling and patterns used across the broader web development ecosystem.
NOTE: ServiceNow Fluent doesn’t currently support extensive on-rails, platform-native ServiceNow UI frameworks.
Development surfaces
Development surfaces on ServiceNow fall into three general buckets: professional developer (i.e. “pro-dev” or “pro-code”) IDEs, low-code/no-code UI-driven forms and builders, and AI chat interfaces. A development team can leverage any combination of these to build apps, and the ServiceNow SDK provides mechanisms for synchronizing the source code to ensure all work is represented and unified in Git. This process enables Git to be the single source of truth, regardless of any individual team member’s preferred workflow.
Pro-dev IDEs
This section first explains the pro-dev local IDE bucket, because that’s where unification with the other UI driven and chat interface buckets occurs. It is also the easiest to explain, because it maps directly to the modern development model enabled by the ServiceNow SDK without extra process or abstraction in between. In this local IDE development model, you have complete freedom to choose your preferred tools. You can write Fluent code and JavaScript in your IDE of choice (such as ServiceNow IDE, local VS Code, and Vim) and then commit that code to Git via your interface of choice (IDE UI, Git GUI client, Git CLI).
The ServiceNow IDE (based on VS Code) provides the “batteries included” on-platform experience with quality-of-life features tailored for ServiceNow development. Its strength is co-location: you write Fluent code and see the resulting metadata in the same environment it installs to, with no toggling between a local editor and a browser pointed at your instance. Built-in UI actions for building, installing, and syncing the codebase abstract the SDK CLI, so you get the source-driven model without working in a terminal. It has built-in support for the Fluent language, and Git operations (branching, committing, pushing, etc.) are performed through the IDE's built-in tooling. This makes it a natural bridge for low-code developers moving into pro-code methodologies.
If you prefer more control and want to be able to work off-platform, the ServiceNow recommendation is to use local VS Code. The same language server and extension that powers Fluent language support in the ServiceNow IDE is available for desktop VS Code via the extension marketplace. Building, installing, and syncing the codebase is done via the SDK CLI (now-sdk), and Git operations are performed using either the VS Code built-in Git tooling or another Git client of choice.
On-platform, UI-driven forms and builders
ServiceNow’s familiar UI driven development surfaces are compatible with a modern SDLC model, due to the SDK’s ability to synchronize the source code with changes made via the ServiceNow development surfaces. You can build a flow using Flow Designer, configure a form using the Form Layout editor, or create application metadata through any other UI-based experience, and those changes can then be synced back to the source code via the ServiceNow IDE/Studio or SDK CLI. When the source code is kept in sync this way, it enables Git to remain the source of truth.
For convenience, if you work in this mode, you can create update sets to track units of work on your dev instance. When you complete a task, your update set can be synced to the source code all at once as a single unit, rather than needing to sync individual increments of work.
Note: ServiceNow does not recommend using these update sets to deploy changes to other instances.
AI chat interfaces
Agentic AI is one of the biggest accelerators of development velocity, and the ServiceNow SDK is the key that unlocks agentic development for ServiceNow. Build Agent, the on-platform AI offering, is available both in the ServiceNow IDE and ServiceNow Studio. Off-platform, you can use Claude Code, Codex, Cursor, or any other AI tool that can interact with a CLI. The SDK is self-documenting (via the explain command) which gives it broad compatibility in the AI ecosystem.
In ServiceNow Studio, Build Agent provides a code-optional experience. You can ask it to perform development tasks, and it will fulfill them without you needing to review code in most cases. This makes it a great option for development teams that are less familiar with source code. Under the hood, it is still writing code via the SDK, but that process is abstracted away from the user.
Build Agent in the ServiceNow IDE, as well as any other off-platform AI tools, provides a more traditional agentic development experience where code changes are visible to and reviewable by developers. This is the best way to tap into the power of cutting-edge AI technology with maximum freedom and control. Frontier models are excellent at reading and writing code, but they still benefit greatly from the guidance of a human who can understand the output and provide feedback. Reviewing code before it lands on an instance offers a much tighter feedback loop and more efficient development process.
On-platform development approach
Before using Build Agent, go into your Developer Sandbox and onto a Git feature branch. Both steps come from Stage 1.2. First, open your Sandbox: Select its name in the Sandbox Management Home Sandboxes table, or use the Sandbox URL your admin provided. Second, create your feature branch from the main branch. Branch creation inside a sandbox is the same as on your base instance, so follow your normal branch-creation flow, just pointed at the sandbox. With your sandbox open and a feature branch created, you can use Build Agent to plan and drive the build, since Build Agent runs on your instance, and this is the first activity that requires the sandbox.
Option 1 : Natural language prompt
Start a Build Agent conversation and describe the use case in natural language. It asks clarifying questions and helps you collaboratively refine your ask.
Example prompt: "Build an app to manage equipment maintenance requests for plant managers. Users need to log incidents, assign them to technicians, track SLA compliance, and generate monthly reports. Integrate with our asset management system via API. Must support role-based access for managers vs. technicians."
Option 2: File import
If your stories live in a spreadsheet or a document, you can attach the file directly to a Build Agent conversation and have it read the requirements into the development session. Build Agent accepts images, PDFs, excel files, documents, and more. Export your epics and stories from Jira, SPM, Azure Boards, (or use Build Agent’s MCP Integration, detailed below) or wherever they live to Excel or .CSV, attach the file, and prompt Build Agent to read the stories and begin development.
Option 3: Import requirements via MCP
If requirements are documented in Figma, Miro, or other supported systems, Build Agent can pull them directly into the development session via MCP.
Prepare (one-time setup):
-
A system admin sets up the corresponding app on Figma, Miro, or the other supported system.
-
Set up the connection using Connect Hub — see Connect to external systems.
-
Approve the connection in AI Control Tower.
Initiate planning with requirements and an MCP connection:
-
Open ServiceNow Studio or the ServiceNow IDE.
-
Create a new workspace (the ServiceNow IDE only).
-
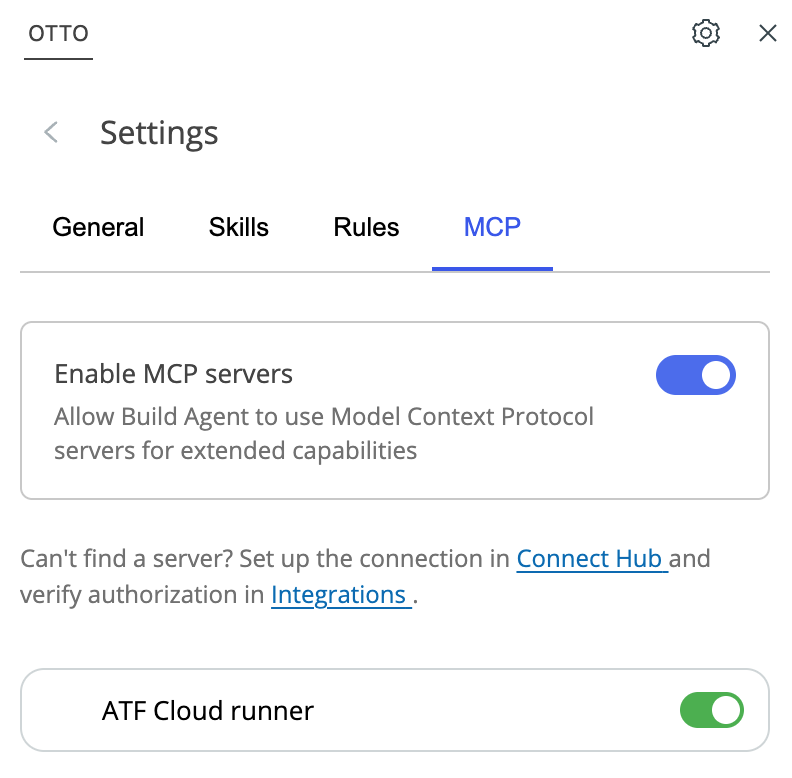
In Build Agent, select Settings and enable the MCP server under the MCP tab.
-
Authenticate and connect to the MCP server of choice.
-
In the Build Agent chat panel, reference your MCP source. For example, "Use the requirements from this Miro board" or "Pull the design spec from Figma."
-
Build Agent loads the context and starts the collaborative build process.
Recommended stack: The pro-dev toolbox
In this model, ServiceNow recommends pro-dev tools and methods: Source code, Git, and an IDE. This is a tried-and-true, industry-standard paradigm that has been empowering professional developers across countless software ecosystems for decades, and is viable for ServiceNow developers using the ServiceNow SDK.
Historically, one of ServiceNow’s key strengths has been UI-driven configuration tooling, which lowers the barrier to entry for people to start building apps and workflows on the platform without much (or any) prior development experience. Pro-dev tooling addresses the same development goal while optimizing for the ways in which teams build at scale. As teams grow and work concurrently, source code, Git, and an IDE let multiple developers build in parallel on their own branches, review each other's changes, and merge cleanly, which raises velocity and efficiency across a team without giving up control or traceability.
That toolbox includes the following:
-
ServiceNow SDK (off-platform)
-
Scaffold new projects from scratch
-
Build and install your code
-
Sync changes from the instance to the code
-
Integrate with other SDLC tooling and pipelines
-
Usable by your favorite AI tools
-
-
ServiceNow IDE/Studio (on-platform) or VS Code (off-platform)
-
Read/write code
-
Fast in-editor feedback
-
AI assistance within the IDE
-
Manage Git within the IDE
-
-
Git + Git platform of choice
-
Isolate your work with branches
-
Get line-by-line review from your colleagues (and AI) through pull requests
-
Resolve conflicts before they ever reach your other instances
-
Complete and precise traceability through history
Off-platform development is especially powerful because individual developers can take advantage of new technologies as soon as they become available. You can tailor it to your development style and adopt new technologies the moment they land in the wider ecosystem, from editor extensions and linters to cutting-edge AI tools, giving you the full velocity and flexibility of the industry-standard developer landscape.
The process: Global app with customizations
This section builds on top of the foundational knowledge established in the previous sections by explaining the step-by-step process of developing an app on ServiceNow using a desktop IDE and the SDK CLI. The on-platform ServiceNow IDE/Studio abstracts away and simplifies some of these steps, so it’s better to study the off-platform process to understand how everything works under the hood.
The example presented here walks through development of a global app that contains both net-new metadata as well as customizations of out-of-the-box metadata, because that covers the full range of features that you should be familiar with to do any kind of ServiceNow development. Standalone global/non-global scoped apps can follow the same process.
NOTE: This section assumes you have installed the ServiceNow SDK globally so that now-sdk commands can be executed in your terminal from any location.
Command examples assume a Unix-style shell (macOS, Linux, or Git Bash / WSL on Windows).
Step 1: Connect the SDK to your instance
You don’t need an internet connection to write code or compile your app, but the SDK needs to connect to an instance for many tasks, such as installing your app, pulling down metadata changes, or taking ownership of out-of-the-box records for customization. Authenticate the SDK with the sandbox you allocated back in the Prepare stage, using the sandbox's URL rather than your base instance.
now-sdk auth --add <instance_url>
Use the full instance URL and follow the prompts to complete the authentication.
Step 2: Initialize the project
When developing apps with the SDK, source code lives in a “project,” referred to colloquially as a “Fluent project.” A project is essentially a directory on a filesystem that contains source code and some configuration for the SDK, NPM, and any other tools that you’re using. The project is what you store in Git and share with your collaborators. The SDK can scaffold a project for you in any directory with an interactive wizard to fill out necessary details like scope name, package name, etc.
Start by creating a new directory in which to scaffold your project from your terminal:
mkdir example && cd example
For this example, create an empty project from scratch and bypass the interactive wizard by supplying some arguments:
now-sdk init --appName=example --packageName=example --scopeName=global --template=base
Since this example uses the “base” template, the above arguments create the bare minimum structure needed for a project: the package.json and now.config.json files. There are other templates available (discoverable via the interactive wizard or via now-sdk init --help) which will include some example code for various use cases.
Now that the minimum structure is scaffolded, all you need to do to finish initializing the project is to download dependencies via NPM. Even if you have the SDK installed globally, installing dependencies locally is necessary to make the SDK’s core libraries available to Fluent files in this project using the command:
npm install
You can also initialize a project from an existing app on your instance, which is useful if you’ve already been working on an app and want to start adopting a modern SDLC model for it. The command to do so is even simpler than the previous:
now-sdk init --from <app_sys_id>
Similar to the command above, this example creates the bare minimum structure needed for a project, but will also include all your existing metadata as XML files in a subdirectory. From there, you can start converting some of those XMLs into Fluent code at your own pace using the SDK’s transform command:
now-sdk transform --from ./metadata/update/sys_script_12345.xml
This example will proceed with the empty project created from scratch.
Step 3: Develop your net-new metadata
With a project in place, you can now start defining your tables, fields, roles, ACLs, business rules, and any other ServiceNow metadata as Fluent code. You can also write your server-side logic in JavaScript (or TypeScript), and build your UI in the front-end framework of your choice. To keep this section lean and focused, it will just create some basic, fundamental metadata.
Start by creating the directory where your Fluent source code will live:
mkdir -p src/fluent
Note: (on Mac; no –p needed for Windows)
This is the default location for Fluent source code, but it is configurable via the now.config.json file. You can now start creating Fluent files (with the .now.ts extension) in this directory. Start by opening the project directory in VS Code, and create a new example.now.ts file under the src/fluent directory. For this example, create a user role, a table, and an ACL:
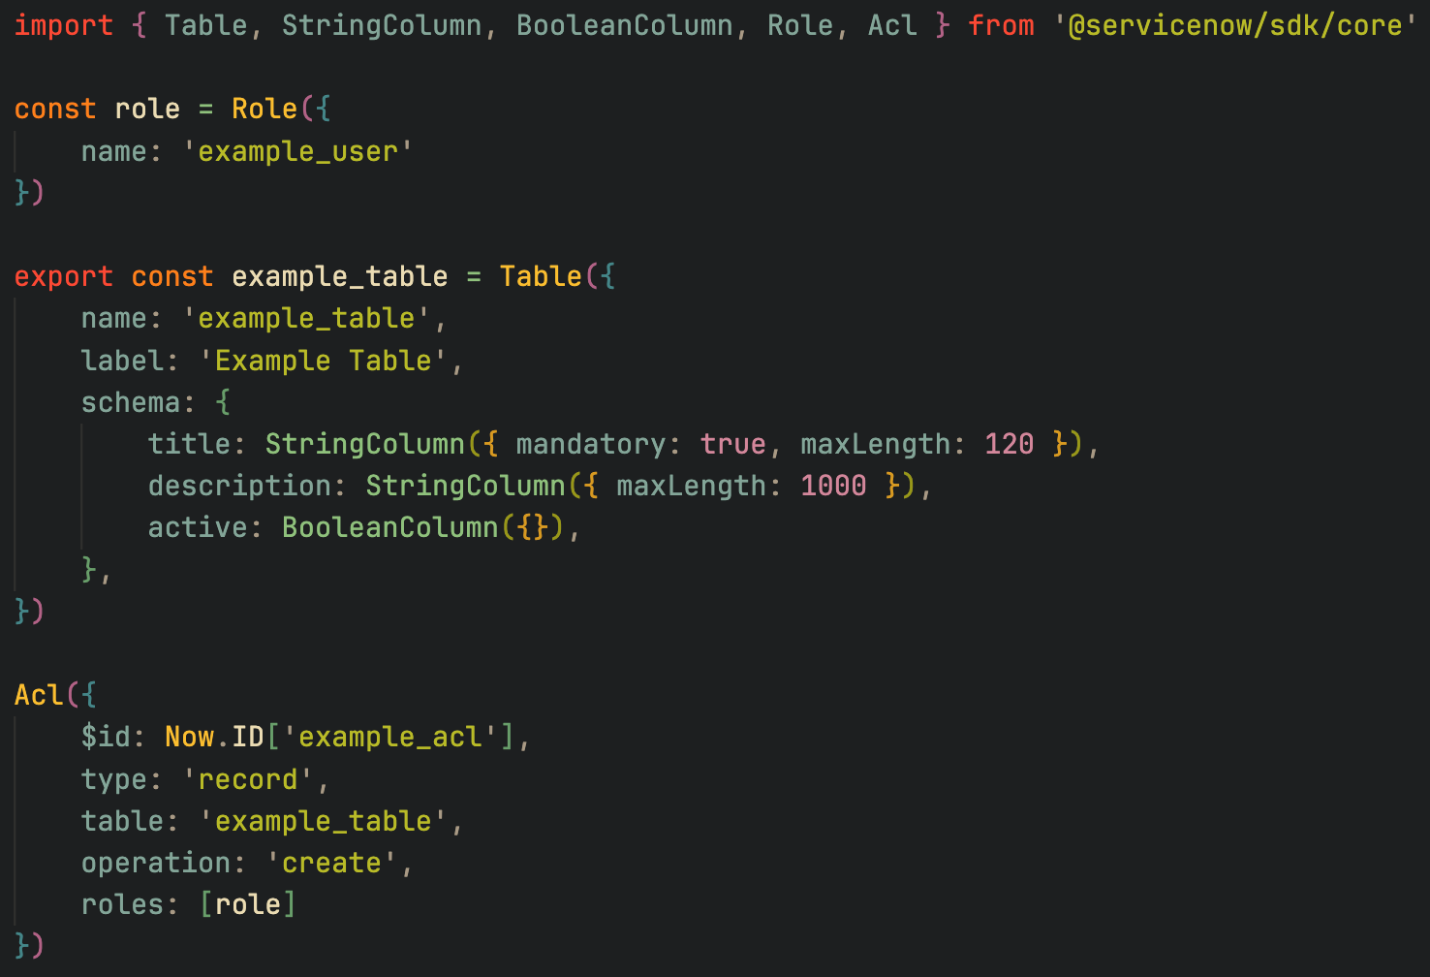
If you have the Fluent Language Support VS Code extension installed, you’ll get in-editor features like diagnostic feedback (errors, warnings, etc.) and typeahead suggestions. This example won’t produce any diagnostics, but you can try changing some of the values (such as the operation value of the ACL) to see this instant feedback in action.
Step 4: Build and install
In this example, you haven’t yet taken ownership of any out-of-the-box metadata to customize it, but the instance is currently the easiest place to do that. Next, it’s time to build and install the app on an instance so you can see it.
Until this point, you’ve been running SDK commands globally. However, the best practice is to run the locally installed SDK version for the project, since different projects might be using different versions of the SDK. Conveniently, the package.json initialized with the project already includes scripts for building and installing, so you can execute those via NPM:
npm run build && npm run deploy
The app should now be installed on the instance you authenticated with in the first step, so log into that instance in your web browser and review the pieces of metadata you created in the previous step.
NOTE: The build and deploy NPM scripts delegate to the local SDK’s build and install commands respectively. You are free to rename or modify these scripts to suit your workflow.
Step 5: Customize out-of-the-box metadata
Now that you're on the instance, this example can cover multiple topics at once by customizing some out-of-the-box metadata, taking ownership of it in your example app, and transforming that metadata into Fluent code. That last part, which ServiceNow calls transforming or “syncing,” is a key part of the iterative SDK development process. It’s how you keep the codebase up-to-date with development activity taking place on the instance, outside of the source code. This is especially important when you have a team of developers that includes both developer personas using IDEs, who prefer to write and edit source code, and UI-driven user personas, who prefer on-platform development surfaces.
Step 6: Iterate
Development is a loop, not a straight line. Validate the app on your Sandbox, find what needs fixing, and repeat the process. If part of the work is genuinely easier on-platform, such as a flow in Flow Designer or a quick form layout change, make the change on the instance and then pull it back into your source with now-sdk transform (the CLI equivalent of the Sync action in the ServiceNow IDE) so that Git stays the single source of truth. Repeat until the app does what you set out to build.
Automated testing
Functional testing
Automated testing in the code stage means you create ATF tests alongside the code you validate, in the same application scope, so the tests ship with the app. ATF tests cover UI interactions, server-side logic, REST APIs, and integration points. The tests can be created by hand through the ATF module, or by having Build Agent generate them directly from the development conversation during the app building process.
Automated testing in the development loop offers scalable quality. A defect caught in the inner development loop costs a fraction of one caught on a test or production instance. Tests scoped to the application become the foundation for every downstream quality control activity in Stage 2. Because they live in the app's scope and ship with it, they give you a regression safety net that catches breakage as the app evolves, rather than after it has already reached a shared instance. The goal is to make test authoring a step inside the development loop, not a separate effort that happens later.
There are three ways to author and run these tests.
On-platform – Test Agent loop: In ServiceNow Studio or the ServiceNow IDE, a simple prompt such as “Write ATF tests for all the feature permutations of this app” results in comprehensive functional tests generated. Build Agent understands application scope and the metadata being changed, so the tests it produces are contextually accurate. Tests generated in Build Agent are editable using natural language right from the Build Agent chat panel or in the standard ATF UI (All > Automated Testing Framework > Tests) after you filter to the scope you are operating in. The Test Agent currently supports 13 step types, including the most common step types such as form, server, REST etc. The Test Agent capabilities are continually improving. If a particular step type isn’t included, you can manually add those test steps using the description in the following Standard UI section. Authored tests are executable from the Build Agent panel. If there are any test failures, they’re automatically triaged by the troubleshooting tool in the Test Agent. It Root Cause Analyzes (RCAs) and updates the tests or the code to achieve passing tests.
On-platform – Standard UI: Navigate to All > Automated Testing Framework > Tests and filter to your application scope. From there, compose tests manually using the step-based editor, selecting from a library of pre-built test steps that cover UI interactions, server-side logic, REST API calls, and integration points. Group related tests into suites for organized execution. Any test failures can be RCA’d, and have fixes applied using the Test Agent in ServiceNow Studio by asking Build Agent to triage the test by passing the test sys_id.
Off-platform: Using the SDK in your preferred IDE, prompt your agentic tool of choice to generate ATF tests for the code being written. Tests generated off-platform must be installed to the instance alongside the application code via the now-sdk installation. Test and suite execution can be triggered via the SDK as well. However, troubleshooting tests must be done on the platform at this time. Follow the on-platform instructions for this area.
Unit testing
Unit testing means validating a single piece of logic in isolation, the smallest and fastest level of testing. On-platform, you can do it through ATF, and off-platform through the SDK with ATF and/or standard JavaScript tooling. As with the ATF tests above, unit tests are authored in the code stage and kept in the application's scope so they ship with the app.
On-platform – Test Agent / Standard UI:
ATF is the framework for unit testing server-side logic such as script includes. You author the test with the Run Server Side Script step, which supports the Jasmine framework and needs no Document Object Model (DOM). In ServiceNow Studio or the ServiceNow IDE, Test Agent can generate this step just as it does for other ATF tests. These tests run on the instance, so they isolate the logic under test but still depend on the platform to execute.
Off-platform – SDK:
The SDK writes server-side logic as JavaScript or TypeScript modules that import their Glide dependencies explicitly, which makes that logic testable with standard frameworks. The most reliable approach is to keep pure computation separate from platform calls and test that logic locally, with no instance. For logic that must call platform APIs like GlideRecord, use dependency injection so a test can supply a fake, because the @servicenow/glide package provides types only, and has no runnable implementation to execute off-platform.
Stage 1.4 - Manage
As mentioned in the previous section, Git is a key piece of the recommended SDLC stack. It offers significant advantages over the in-platform options like update sets, and is the best fit for distributed management of source code for applications of all sizes.
Historical context
Prior to the ServiceNow SDK’s source-driven development model, the lack of a distinction between design-time and runtime concerns resulted in platform features that had to contend with both. While these features made sense within the constraints they were created, they’re not the best tools for current conditions.
Update sets
Update sets are perhaps the longest-standing ServiceNow feature for tracking and migrating changes to application metadata, and still the most widely used. They work like a recorder with “start,” “stop,” and “replay” buttons:
-
Open an update set and activate it (“start”).
-
Make changes to application metadata. As you’re making changes, snapshots of the records you touched appear in the update set.
-
When you’re done, you mark the update set as complete (“stop”). Complete update sets can be exported.
-
After importing/retrieving to another instance, preview and commit the update set (“replay”), which unloads each record snapshot in the payload, overwriting whatever exists in the target instance.
Update sets were designed for recording and moving changes and not for concurrent collaboration across large teams. Recording the original changes is straightforward, but committing those changes to another instance can be challenging when two update sets contain conflicting changes. When that happens, conflicts must be resolved, which can be a painstaking process. There’s no method for a robust line-by-line merge of conflicting changes, so you usually must pick only one of two states of individual records and then fix-forward. Otherwise, you must go back to the development instance and try to manually reconcile the differences.
Update sets don’t provide a clean way to review granular changes throughout their history, or to return directly to a specific point in that history. Going back in time requires incrementally backing out update sets one-by-one the required previous state is attained. There are numerous ways a back-out operation can fail to complete, which means it’s often impossible to return to an exact previous state.
Source control in Legacy Studio
Realizing the shortcomings of update sets and the advantages of Git, ServiceNow attempted to provide an in-platform Git-based solution to bridge the gap: the “Source Control” integration in the Legacy Studio. Created as a counterpart to the Application Repository, it was intended to provide some semblance of proper source control management (SCM) to app developers looking to move away from update sets. However, it suffered from fundamental weaknesses that prevented it from achieving that goal:
-
It funneled you into a "one branch per-repo per-instance" model that effectively minimized efficient collaboration and sabotaged most of the key benefits that Git provides. Instead of being cleanly distributed, development was concentrated into chokepoints that made branching and merging effectively impossible.
-
The source format itself was unmanageable: Hundreds, even thousands of incomprehensible XML files (often filled with irrelevant noise, such as timestamps) prone to excessive conflicts and unfit for human consumption. There was no way of knowing whether an app was in a functional state in this format until it was installed and tested on an instance.
Git: The modern solution
Git is well suited for handling distributed development of large projects written in source code, which makes it a great counterpart to the ServiceNow SDK’s source code-based development model.
Prior to the SDK, there was no distinction between design-time and runtime concerns in ServiceNow. All development took place in the database and was immediately effectual in the runtime environment. Tracking changes required exporting database records from the runtime environment into XML files, but XML is just a serialization format in that model, not a source of truth. Therefore, trying to track the XML files in Git was more akin to storing files in a cloud drive than proper source control, and the contents would be largely incomprehensible. For Git to work effectively, the Git repo must:
-
Be human- or agent-readable, so you can easily make sense of each line of a diff
-
Not change except as a direct result from a justifiable, auditable developer/agentic action
-
Be the authoritative source of truth for the state of the software being tracked
The SDK provides all the characteristics necessary for managing apps and their source code effectively in a Git repo. The source code is easy to read and maintain, and can serve as a proper source of truth from which deployable artifacts are built and installed on ServiceNow instances.
Payload transportation mechanisms
Earlier, this document recommended against update sets for authoring, source control, and merging between developers, and that guidance stands. Update sets appear here in a role to move a validated app version between instances. With that distinction made, there are two ways to transport payloads from development toward production, and you choose based on the tooling your team has adopted.
Path 1: Update set-based movement with ReleaseOps
When you publish an application to the Application Repository, ServiceNow automatically creates an update set that stores an instruction for destination instances to install that version. Used this way, the update set is a transport artifact that carries an install instruction.
If using source control, pull your main branch into a subproduction (dev) instance using ServiceNow Studio. Then publish the application to the Application Repository, automatically generating the update set mentioned above.
From the development instance, select Promote Update Set to create a new Deployment Request or add the update set to an existing one. The Deployment Request records the payloads that proceed through your organization's assessment process, and ReleaseOps automates assessment and release across the instances closer to production, covering ATF, manual UAT, and whatever else your process defines.
See ServiceNow Docs for details on ReleaseOps use, specifically:
-
Creating a Deployment Request for Scheduled Release or On Demand Release
-
Promoting an Update Set for deployment or attaching to an existing Deployment Request
Path 2: Source control-based movement with CI/CD
Alternatively, if your team has adopted modern source control and CI/CD tooling, you can drive movement from Git rather than by promoting update sets. Git is the source of truth, and a CI runner orchestrates the ServiceNow SDK and the CI/CD REST APIs. The development instance is where you build and install directly; the test and production instances install from the Application Repository, which serves as the immutable, versioned artifact store.
For the full pipeline if you're using source control instead of update sets, see Appendix B.
Stage 2 - Test and verify
2.1 - Start quality control process
Via ReleaseOps, ServiceNow enables you to define your quality control processes via Playbooks. The following is a simple out-of-the-box example.
-
Run Instance Scan on the development instance and address any reconciliations.
-
Move payloads to a test instance.
-
Run ATF on the test instance and address any reconciliations.
-
Mark the Deployment Request as Ready to Deploy.
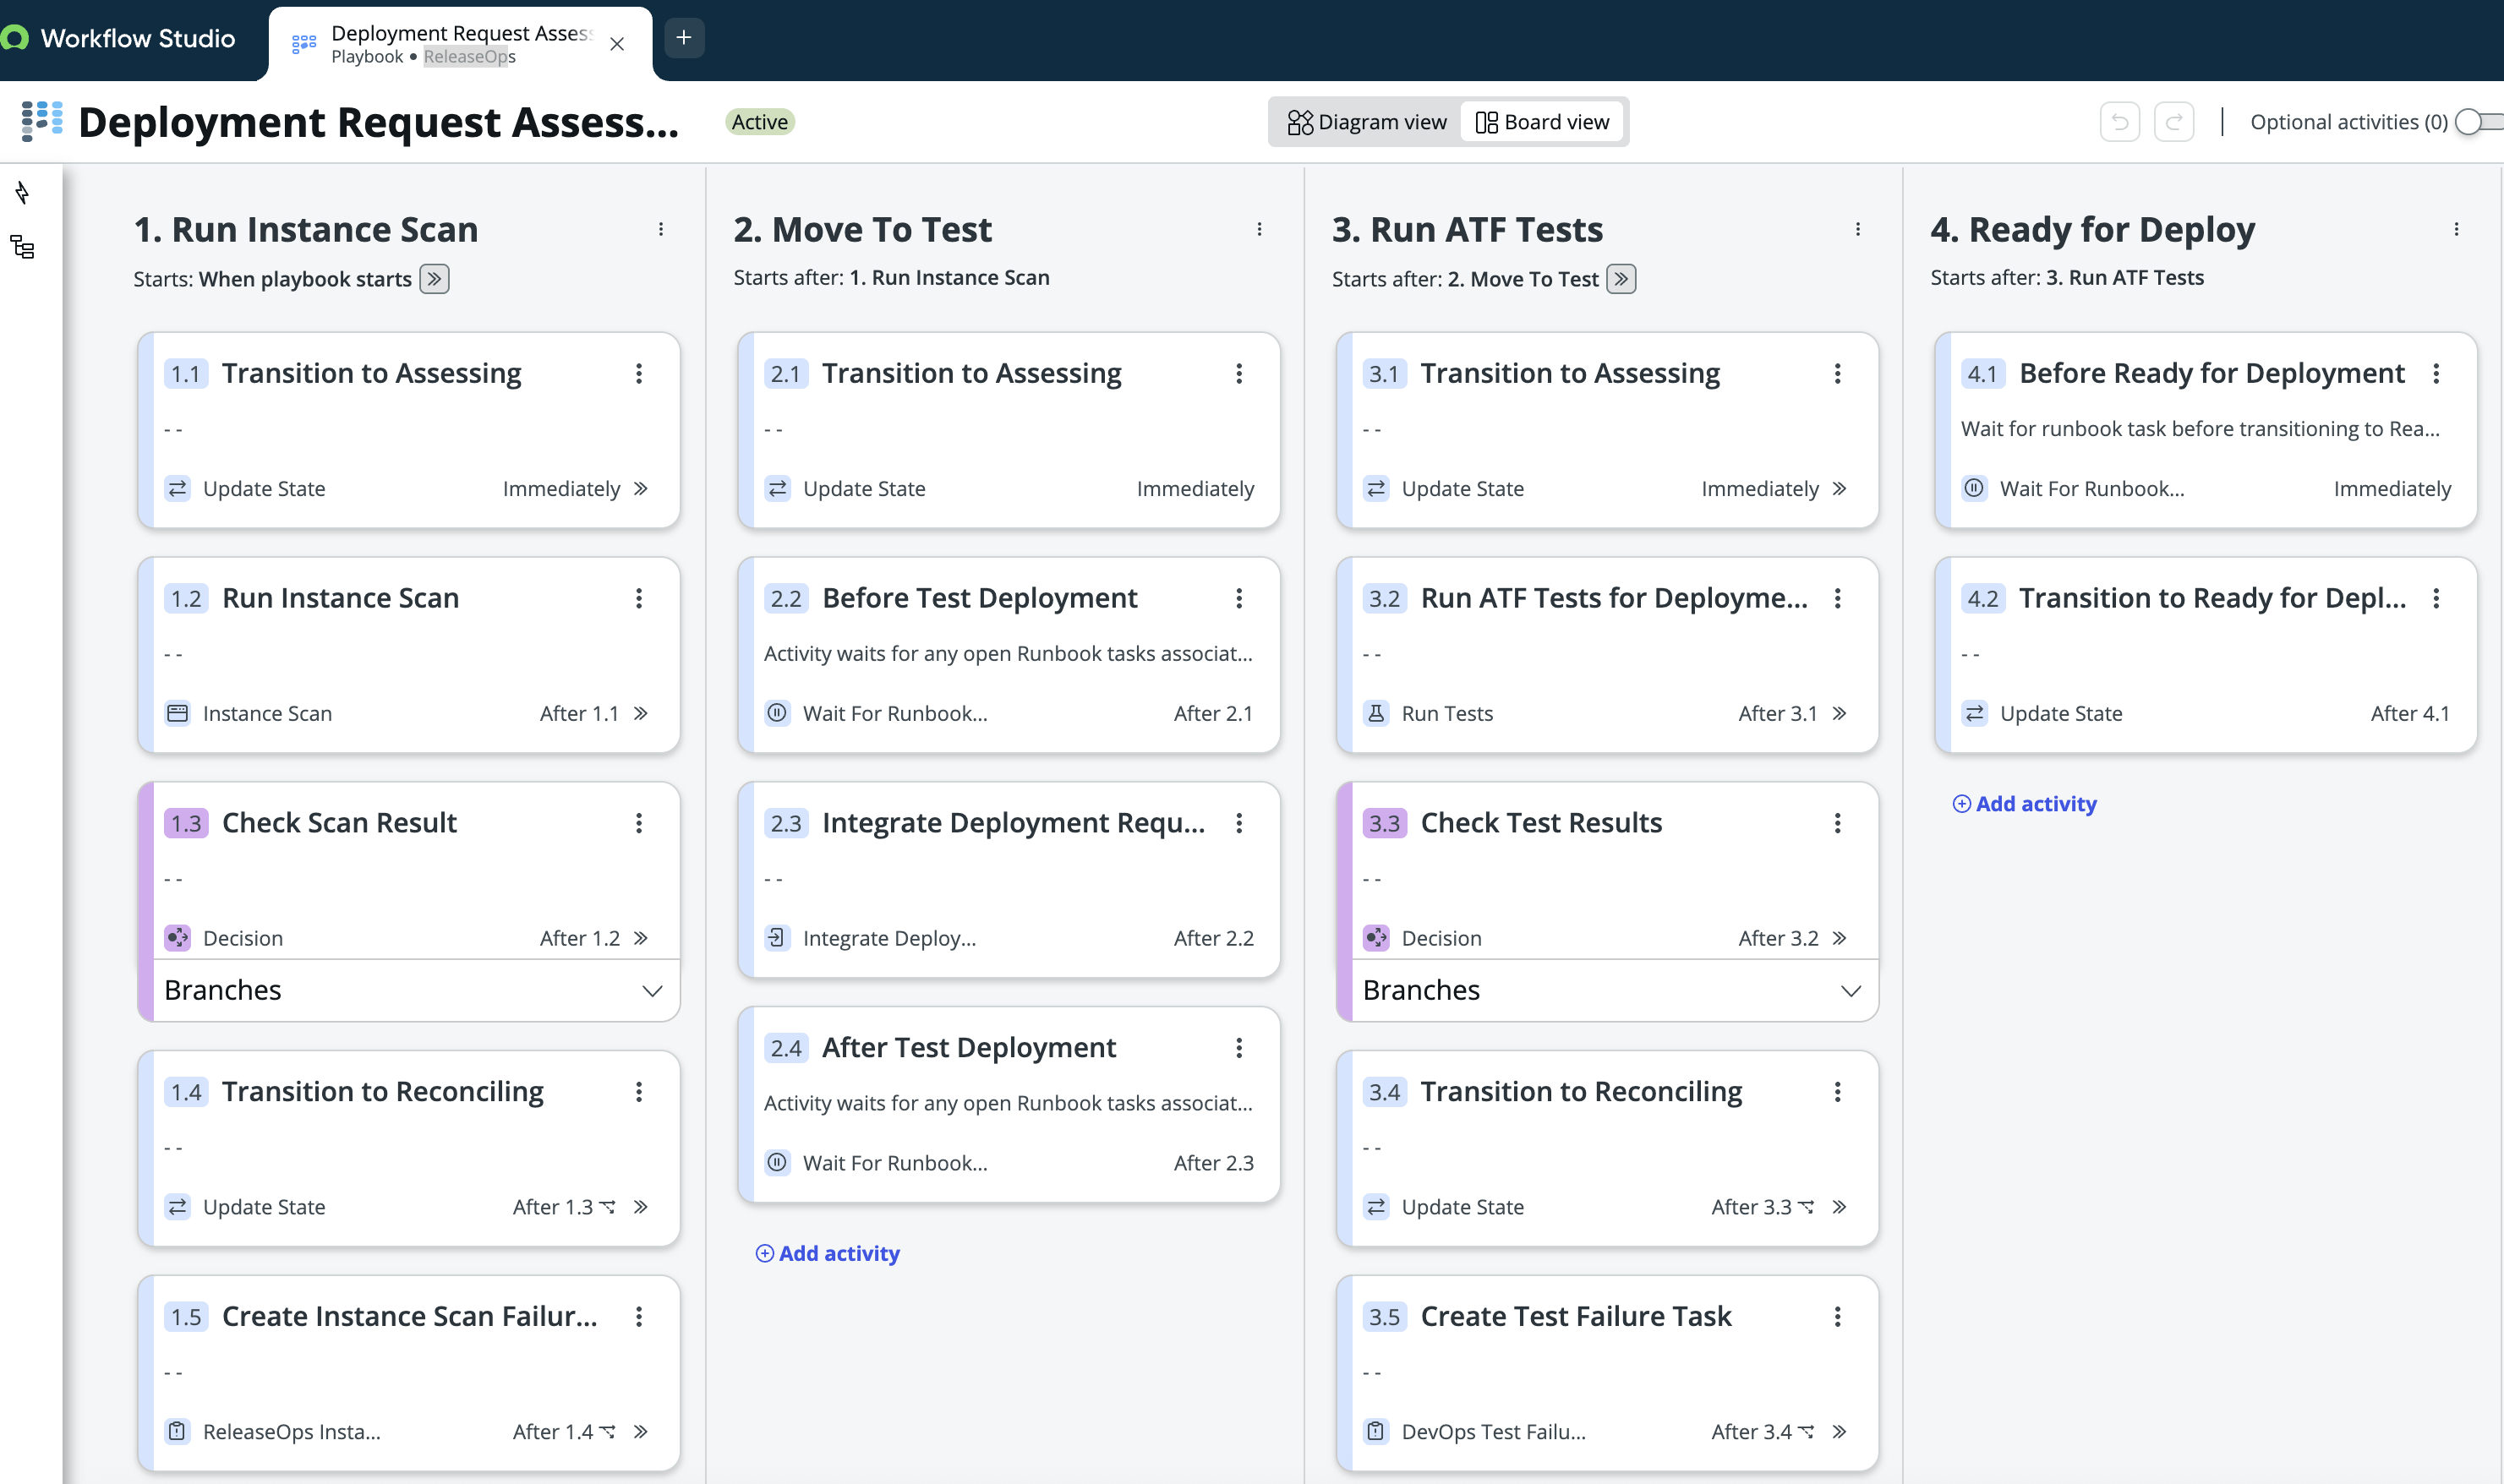
To begin the process, the Deployment Request containing the update sets must be marked as Ready to Assess via the UI action of the same name.
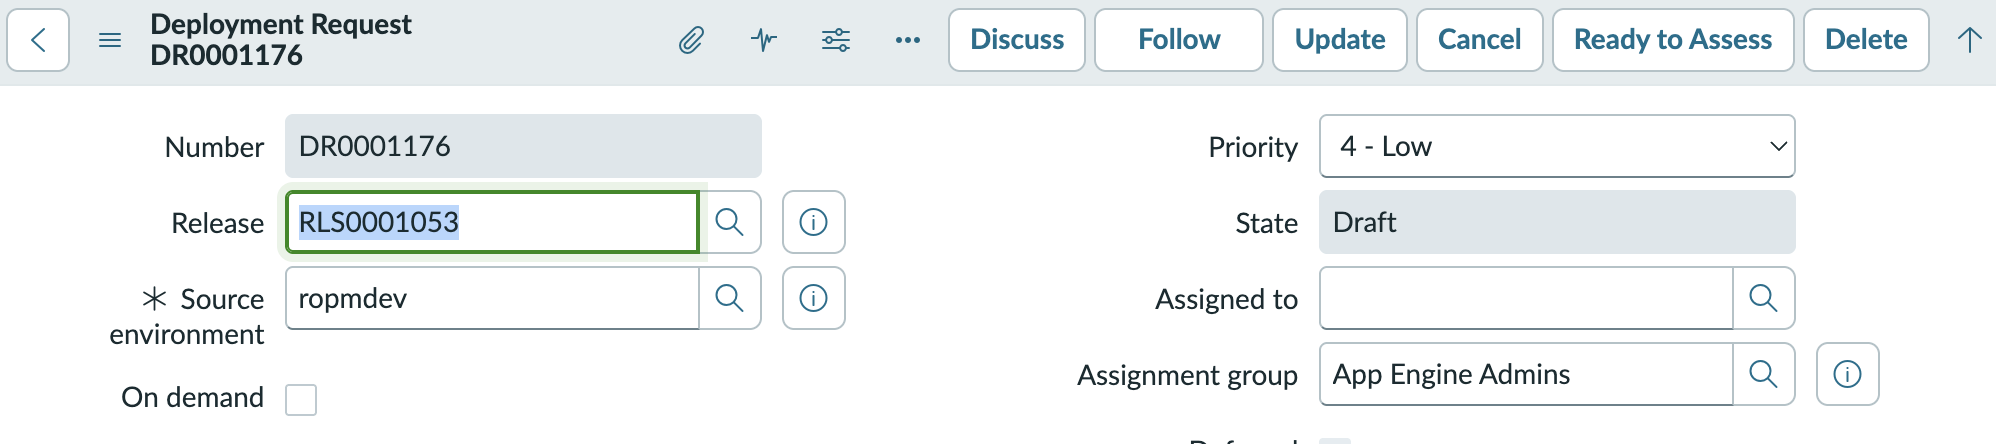
The Deployment Request must already be targeting a release. After the Deployment Request is Assessing, Release Ops automatically runs the quality control process.
When quality control demands more building for reconciliation, revert the Assessment to Draft and add more payload, then restart the Assessment when complete.
2.2 – Test in your environment
Testing on a shared test instance provides integration-level validation. The goal for the testing step is to confirm that the application behaves correctly in an environment that resembles production.
For the Test Agent loop, the core prerequisite installations are the ATF Test Generator and the Cloud Runner app, which is a free app on the ServiceNow Store and provides two free Cloud Runner lanes for seamless execution capabilities to trigger from the Build Agent panel. The Cloud Runner application provides the execution infrastructure that enables ATF to run test suites against a target instance without requiring a local browser session. Cloud Runner connects to the ServiceNow cloud execution environment, which means that tests can run as part of automated pipelines without human intervention.
When setting up a Cloud User, Cloud Runner authenticates to the target instance using a dedicated service account, the Cloud User. This is a one-time configuration step, in which you create a dedicated user with the ATF Runner role, generate credentials, and register those credentials in the Cloud Runner configuration. Once set, Cloud Runner uses this account for all automated test executions, and no individual developer credentials are involved in pipeline runs.
2.3 - Maintain suites
As your application evolves, your tests must evolve alongside it. Test Agent can automate this maintenance by inspecting code changes when prompted and updating tests to keep pace with the application, eliminating the manual effort of rewriting tests after each update.
2.4 - Troubleshoot
When a test fails, Test Agent works through Build Agent to diagnose the problem, apply a fix, and rerun the test, repeating this cycle until the test passes.
Note: Test Agent's execution and triage capabilities are accessible only from the ServiceNow Studio surface currently.
To determine the cause of a failure, Test Agent examines the relevant metadata records and logs on your instance, building an understanding of what went wrong before attempting a resolution. Tests executed directly from Build Agent are triaged automatically as part of this process. For tests run outside of Build Agent that fail, you can prompt Build Agent to triage the failure, and it follows the same diagnose-fix-rerun workflow.
ATF tests executed via ReleaseOps will generate tasks for reconciliation. For a Deployment Request with ATF tests that have failed, you must select one of the following paths:
-
Retest – Covers scenarios where tests were faulty and repaired
-
Need Code Change – The payload must be altered to fix the issue
-
Sign Off – For the scenarios where you want to proceed despite test failures
In the case of Need Code Change, the current assessment is invalidated, and the Deployment Request returns to Draft. The expectation is that a new payload is added to the Deployment Request before re-assessment.
Stage 3 - Release and deploy
There are two ways to move a validated app version from development toward production, and you choose based on the tooling your organization has standardized on. The first orchestrates the release on the platform with ReleaseOps; the second drives it from your own Git-triggered CI/CD pipeline.
3.1 - Using ReleaseOps to push to production
This path fits teams running their release process on the platform. Once your changes are merged and your main branch represents the version you intend to ship, install that version to your development sub-production instance and publish the app to the Application Repository. Publishing generates an update set that carries an instruction for destination instances to install that version; used this way, the update set is a transport artifact, not the hand-recorded change payload the earlier sections advised against. From the development instance, select Promote Update Set to create a new Deployment Request or add to an existing one. ReleaseOps then assesses the payload, and once assessment passes, the Deployment Request reaches the Ready for Deployment state.
After a Deployment Request reaches Ready for Deployment, its payloads wait for the conditions of the defined release before moving to production. On Demand releases move payloads as soon as assessment is complete; Scheduled releases move all Ready-to-Deploy Deployment Requests at the scheduled time. ReleaseOps lets you define both the assessment and the release processes.
3.2 - CI/CD pipeline (Git-triggered)
This path fits teams that have already adopted Git-based source control and a CI/CD system and want deployment automated in that system rather than on the instance. Git is the source of truth and a CI runner orchestrates the ServiceNow SDK and the CI/CD REST APIs. The development instance is where you build and install directly; the test and production instances install the published version from the Application Repository. ServiceNow provides GitHub Actions and GitLab CI/CD Docker images as wrappers for the CI/CD APIs.
Guardrail note: The SDK's direct install is for the development instance only. Test and production installations via the Application Repository using the CI/CD APIs provide four primary benefits:
-
An immutable versioned artifact that persists independently of the CI runner
-
Native rollback in a single call
-
A security boundary where the instances install from a repository they trust rather than accepting a direct connection from the runner
-
An audit trail of every publish and install with entitlement control.
Important note: do not use the SDK to deploy to production.
See Appendix B for the implementation reference for this path.
3.3 - Revert
If new app versions and installations must be reversed, you can roll back the installation within a fixed time window using the associated rollback context. This feature is only available when installing from the Application Repository.
Appendix A- ReleaseOps setup
This section provides resources for the installation, setup, and configuration of ReleaseOps. ReleaseOps requires some configuration because it is meant to execute your quality control measures across your instances.
Install plugin and setup instance topology
-
Install ReleaseOps Plugin - This Doc site topic explains how to install the ReleaseOps plugin, which must be done on each instance you want in your pipelines.
-
Run ReleaseOps Guided Setup - This Doc site topic explains how to navigate the Guided Setup. Guided Setup builds all the trust profiles among the instances, and establishes which instance is the controller.
Defining your process
ReleaseOps has two different processes expressed in ServiceNow Playbooks:
-
The Assessment process is the act of ensuring payloads are ready to deploy to the final destination instance (typically Production).
-
The Release process is the act of the final move of the Ready to Deploy deployment requests to Production.
These processes are integrated into Pipeline records that dictate which Assessment and Releases Processes are used. See Add and Modify Pipelines for more information.
ServiceNow ships with a single Release playbook and 2 different Assessment playbooks. The Release playbook likely won’t need modification, but if you have a pre-existing process for assessing work for deployment, you may need to copy and edit the Assessment process playbook.
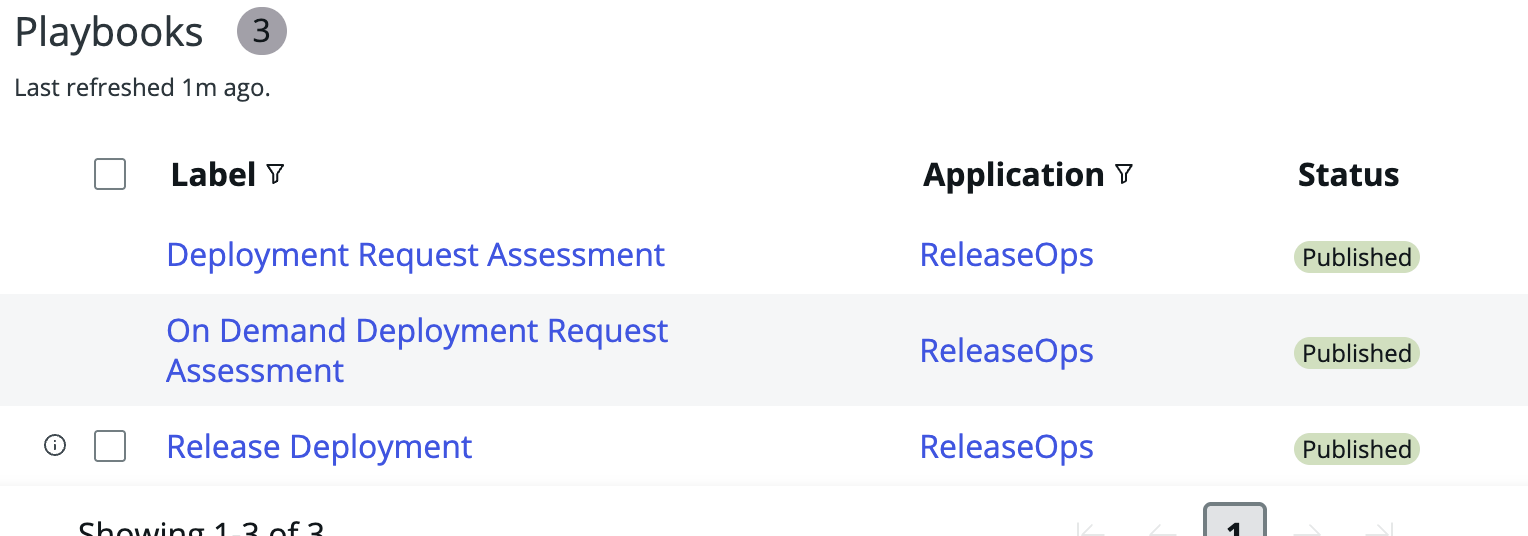
Appendix B- Automating CI/CD pipeline for ServiceNow App Development
Reference for teams adopting modern source control and CI/CD on the ServiceNow platform
Goal
This appendix describes how to build, test, and deploy a ServiceNow application through an automated CI/CD pipeline. The pipeline automates the build, test, and deployment path so that routine deployment does not require manual configuration in an instance. The objective is to automate repetitive deployment tasks for agile development and iteration.
Scope and assumptions
-
Commercial SaaS instances. Application Repository is provisioned automatically for commercial SaaS customers at https://apprepo.service-now.com.
-
ServiceNow SDK and Fluent. The ServiceNow SDK is the build engine and Fluent is the source language.
-
Git-based source control and a CI/CD system. Any Git-based source control system and any CI/CD system that provides the capabilities to run this pipeline.
1. Recommended approach
This pipeline combines three primitives:
-
ServiceNow SDK (version 4.10.0 or later) as the build engine, the development install mechanism, and the publish source for Application Repository.
-
Application Repository as the immutable, versioned artifact store that installs to the test and production instances.
-
now-sdk cicd, the SDK CLI's wrapper around the CI/CD REST APIs, to automate publishing from the development instance, installation to the test and production instances, rollback, and Automated Test Framework (ATF) runs.
Instance-side setup is minimal and performed one time. The only configuration performed in the instances is per environment OAuth provisioning. On each instance, create an Inbound Application Registry record that uses the client_credentials grant. The pipeline orchestrates all remaining steps.
Git is the source of truth. The CI runner orchestrates the ServiceNow SDK, including now-sdk cicd. Application Repository installs to the test and production instances and provides native support for versioning, testing, and rollback.
2. Required CI/CD capabilities
Automating the CI/CD pipeline leverages the following four capabilities available on various tools:
-
A build runner that runs the ServiceNow SDK CLI and makes authenticated REST calls.
-
A versioned artifact store that retains build output so that the application is built once and installed to each environment from the same artifact.
-
A per-environment secret store that isolates the development, test, and production credentials so that a job targeting one environment cannot read the credentials of another.
-
An enforceable approval gate that pauses the pipeline before the production install until designated approvers approve, and that a standard merge cannot bypass.
The following table maps each capability to common CI/CD platforms.
| Capability | GitHub actions | GitLab CI/CD | Azure DevOps | Jenkins |
|---|---|---|---|---|
| Build runner for the SDK CLI and REST calls | Hosted or self-managed runners | Shared or self-managed runners | Microsoft hosted or self-managed agents | Agents and nodes |
| Versioned artifact store for build output | Workflow artifacts | Job artifacts or package registry | Pipeline artifacts or Azure Artifacts | Archived artifacts or an external artifact repository |
| Per environment secret store | Environment secrets | CI/CD variables scoped to protected environments | Variable groups with environment scoping | Scoped credentials with secret masking |
| Enforceable approval gate before the production install | Environments with required reviewers | Protected environments with deployment approvals | Environment approvals and checks | Manual input step in the pipeline |
3. Step-by-step pipeline
One-time setup
Complete the following steps one time, before running the pipeline.
-
Pin the SDK version in package.json to @servicenow/sdk@4.10.x or later.
-
Initialize the project:
-
Run now-sdk init for a greenfield project.
-
Run
now-sdk init --from <sys_id>, thennow-sdk transform, for a brownfield application that is already installed in production.
-
-
Provision OAuth Inbound Application Registry entries on the development, test, and production instances. Each instance receives its own client_id and client_secret. Assign only the roles that the environment requires for its part of the pipeline: install, publish, rollback, or ATF. For the per instance steps, see Appendix A1.
-
Store each environment's client_id, client_secret, and instance URL as environment scoped secrets in the CI/CD system, one set per environment (development, test, production). Map them to
SN_SDK_OAUTH_CLIENT_ID,SN_SDK_OAUTH_CLIENT_SECRET, andSN_SDK_INSTANCE_URL— the environment variablesnow-sdk installandnow-sdk cicdread for non-interactive authentication (along withSN_SDK_NODE_ENV=SN_SDK_CI_INSTALLandSN_SDK_AUTH_TYPE=oauth; see the Authentication section of the CI Integration guide). Do not store them as globally shared secrets. -
Configure required approvers on the production environment in the CI/CD system. This configuration makes the approval gate in the per-change pipeline enforceable.
-
Connect the Git repository to the project. No source control link in the instance is required; Git is the source of truth.
Per-change pipeline
Trigger: The pipeline runs on each pull or merge request and again on merge to the main branch.
Each step below runs with only that step's environment secrets exported (development, test, or production — see One-time setup, step 4), so now-sdk/now-sdk cicd authenticate against exactly one instance per job and a job for one environment can never see another environment's credentials.
Before merging: bump version in package.json (and tag the commit to match) for any change intended to ship. Steps 3, 4, and 7 below all default --app-version from that field, and Application Repository versions are immutable — publishing a version that already exists fails.
-
Build: The runner runs
now-sdk build --frozenKeysand uploads the output to the artifact store.--frozenKeysfails the build ifsrc/fluent/generated/keys.tswould change, catching a developer who pushed a new or modified identifier without committing the regenerated file — see the Builds section of the CI Integration guide. The application is built once and installed to each environment from this artifact. -
Development install: With the development environment's secrets exported, the runner downloads the artifact and runs
now-sdk installagainst the development instance. -
Publish to Application Repository: With the development environment's secrets still exported, the runner runs
now-sdk cicd publishagainst the development instance.--app-versiondefaults to theversionfield in package.json when omitted, so this publishes exactly the version the code declares. This creates an immutable, versioned artifact in Application Repository. The development instance is the publish source. -
Test install: With the test environment's secrets exported, the runner runs
now-sdk cicd installagainst the test instance.--app-versionagain defaults from package.json, so this installs the same version just published. The test instance installs from Application Repository, using the same artifact that is later installed in production. -
ATF run: With the test environment's secrets still exported, the runner runs
now-sdk cicd testsuite run --test-suite-sys-id <sys_id> --wait(or--test-suite-name) against the test instance. The command polls the run for its own progress and exits non-zero on failure, which stops the pipeline. -
Production approval gate: The environment approval configured during setup pauses the pipeline. Designated approvers approve the deployment in the CI/CD system. No approval workflow in the instance is required for this gate.
-
Production install: With the production environment's secrets exported, the runner runs
now-sdk cicd installagainst the production instance, again relying on the package.json-derived--app-versiondefault. The production instance installs from Application Repository. The runner does not connect to the production instance directly during build or test. -
Record and tag: The runner updates the linked change record, through REST or DevOps Change Velocity, with the deployed version, and tags the Git commit with the deployed semantic version.
-
Rollback: On an install failure, or on a post install smoke test failure in the test or production instance, the runner runs
now-sdk cicd rollback --app-version <previous_semver>(the version to revert to) against that environment. This step is automated and requires no manual intervention.
Note: now-sdk cicd and now-sdk install fetch a fresh OAuth access token themselves at the start of each invocation, using whichever environment's secrets are exported for that job — no separate token-management step is needed. See Promotion and Testing with now-sdk cicd in the CI Integration guide for the full command reference, including --wait, --select, and rollback.
Appendix A1. Provisioning OAuth Inbound Application Registries
Perform this procedure on each instance: development, test, and production. Repeat it three times, adjusting the assigned roles per environment as described in step 2.
-
Create the service account user**.** Go to User Administration > Users and select New.
-
Set the User ID to a descriptive value such as svc_cicd_dev (svc_cicd_test and svc_cicd_prod on the other instances).
-
Set Web service access only to true so that the account cannot sign in to the UI.
-
Set Internal Integration User to true so that the account does not consume a fulfiller license.
-
Set a password. The password is a required field but is not used, because the client_credentials grant does not use password authentication.
-
-
Assign roles according to the pipeline operations performed on that environment. Assign the least privilege required.
-
Development (target of now-sdk install and source of the Application Repository publish): The admin role, or a custom role that grants write access to sys_app, sys_app_file, and sys_update_xml, plus the role of the target application scope, plus the CI/CD developer and app lifecycle publisher roles required to publish.
-
Test (installs from Application Repository, runs ATF, performs rollback): The CI/CD admin role, the app lifecycle publisher role, and the target scope role.
-
Production (installs from Application Repository, runs ATF, performs rollback): The CI/CD admin role, the app lifecycle publisher role, and the target scope role.
-
-
Create the OAuth Application Registry record. Go to System OAuth > Application Registry, select New, then select Create an OAuth API endpoint for external clients. Set the following fields:
-
Name: A descriptive, environment scoped value, for example CI/CD Dev.
-
Client ID: Leave the auto-generated value.
-
Client Secret: Leave the auto-generated value. Record this value immediately and store it in its intended location. Navigating away from the record requires regenerating the secret.
-
Default Grant Type: Client Credentials. If the release surfaces the grant type only on the related OAuth Entity Profile, set it on that profile.
-
Access Token Lifespan: 1800 seconds is a reasonable default.
-
PKCE Required: False. This integration is machine to machine, not browser-based.
- Bind the OAuth client to the service account. On the Application Registry record, set the User field to the service account created in step 1.
**Important: **This step is required. If the User field is not set, the client_credentials grant issues tokens that run in an anonymous context, and installations fail with permission errors that resemble a role configuration problem rather than an OAuth configuration problem.
- Test the token endpoint from a workstation before configuring the pipeline.
curl -X POST https://<instance>.service-now.com/oauth_token.do \
  -d grant_type=client_credentials \
  -d client_id=<client_id> \
  -d client_secret=<client_secret>
The response is a JSON object that contains an access_token. A response of invalid_grant indicates that the User field is not set or that Web service access only is misconfigured. A response of invalid_client indicates an incorrect client secret.
- Validate the configuration. Call a low-risk endpoint such as
/api/now/table/sys_user?sysparm_limit=1with the headerAuthorization: Bearer <token>. A successful read confirms that the token runs as the service account with that user’s roles. Configuration for that instance is complete.
The result is three credential pairs, each scoped to one instance, each associated with one service account, and each carrying only the roles required for that environment.
Storing the credentials: Store the client_id, client_secret, and instance URL as environment scoped secrets in the CI/CD system, one set per environment, not as globally shared secrets. Environment scoping prevents a job targeting the development environment from reading the production secret. Add required approvers on the production environment to make the approval gate enforceable. Without required approvers, any merge to the main branch deploys to production without review.
Appendix B1. Application Repository and CI/CD APIs compared with direct SDK install
The ServiceNow SDK and the CI/CD REST API are complementary. This section explains why the test and production instances install from Application Repository through the CI/CD APIs rather than through a direct SDK install.
Architectural considerations
The now-sdk install command pushes build output directly from the CI runner to the target instance. This method is suitable for the development instance. For the test and production instances, it does not provide four capabilities that a controlled release typically requires:
-
Immutable, versioned artifact: Application Repository stores a fixed version of the application, identified by a semantic version. The version remains available even if the CI runner is removed. With a direct SDK install, the artifact exists only in CI runner storage.
-
Native rollback: The app_repo/rollback endpoint reverts the test or production instance to the previous published version with a single API call. With a direct SDK install, rollback requires checking out the previous Git tag, rebuilding, and reinstalling.
-
Security boundary: With Application Repository, the test and production instances install from a repository that they already trust. With a direct SDK install, the CI runner connects to the test and production instances on every deployment. The Application Repository model is generally preferred by enterprise security teams.
-
Audit trail and entitlement control: Application Repository logs every publish and install at https://apprepo.service-now.com and controls which instances are entitled to which versions. A direct install is logged only in the run history of the CI/CD system.
Direct install on the development instance: Application Repository install and rollback operate only on a version that has already been published, and publishing captures the current state of a live instance. The development instance is where new code is created, before a version exists to publish. After code is validated in the development instance and published, the test and production instances use the Application Repository and CI/CD API path for immutability, rollback, the security boundary, and the audit trail.
Endpoint coverage
Beyond build, install, auth, transform, init, and dependencies, the SDK CLI's now-sdk cicd command wraps the CI/CD REST API directly — no manual REST calls or OAuth token handling required. See the CI Integration guide for full usage, including polling, --wait, and rollback:
-
now-sdk cicd publish: wraps /api/sn_cicd/app_repo/publish — publishes a version from a source instance to Application Repository. -
now-sdk cicd install: wraps /api/sn_cicd/app_repo/install — installs a published version on a target instance. -
now-sdk cicd rollback: wraps /api/sn_cicd/app_repo/rollback — rolls back to a previous published version. -
now-sdk cicd testsuite run(ornow-sdk cicd test runfor a single test): wraps /api/sn_cicd/testsuite/run (and /api/sn_cicd/tests/run_test) — starts an ATF run. -
now-sdk cicd testsuite watch(ornow-sdk cicd test watch): wraps /api/sn_cicd/progress/{progress_id} — polls a long-running operation until it completes.
The CI/CD REST API still provides endpoints the SDK CLI does not currently expose, which require direct REST calls:
-
/api/sn_cicd/instance_scan/full_scan and related endpoints: Runs an instance scan and return the results.
-
/api/sn_cicd/plugin/activate: Activates a plugin.
-
/api/sn_cicd/plugin/rollback: Rolls back a plugin activation.
-
/api/sn_cicd/app/batch/install: Installs multiple applications in one transaction.
-
/api/sn_cicd/sc/apply_changes: Applies remote source control changes. This is a legacy endpoint for the Studio and source control flow.
Appendix C1. Switching the development instance between branches without losing test data
**Note: **This procedure applies to the ServiceNow SDK build model and to Fluent declarative behavior.
Reinstalling the development instance from a branch other than the one currently installed, for example replacing a feature branch with main, uninstalls the application first. The now-sdk install --reinstall command produces a clean installation that matches the new branch, and the data removal is a side effect of the uninstall step. For a scoped application, this removes the tables the application owns and all rows in those tables. Data defined declaratively through the Fluent Record() API is recreated from source on install, and therefore persists. Data created manually in the UI during testing is not defined in source and does not persist.
Why schema from a feature branch can persist after the branch changes
Removing a field from Fluent source does not retract the field from the instance on the next install. Fluent requires an explicit declared deletion, using Now.del(), to remove an item that was previously installed. Because the source for main never referenced the fields added on the feature branch, a standard now-sdk install of main does not remove those fields.
Path 1: Retract the schema explicitly (no data loss)
Before moving the development instance off a feature branch that added fields or tables that are not present in main, retract those additions explicitly rather than relying on --reinstall.
-
Declare the retraction: In the feature branch, declare only the fields to retain. The retained schema persists after the application is reinstalled.
-
Reinstall from the branch: Run now-sdk install (without --reinstall) against the development instance from that branch. The retraction applies without an uninstall and without data loss.
-
Switch to main: Confirm that the fields are removed, then point the development instance at main and run a standard now-sdk install.
**Important: **This procedure removes only what is explicitly declared. Retract schema additions as a checklist item before a feature branch is abandoned or merged. The retraction does not occur automatically.
Path 2: --reinstall with a backup and restore step
Use this procedure when Path 1 was not performed, when a branch is abandoned, or when the schema drift is too extensive to clean manually. This procedure accepts the full data removal from --reinstall and preserves manually created test data externally.
-
Export the data before reinstalling: For each table with data to retain, call
GET /api/now/table/<table>with the appropriate query before running --reinstall. Save the result as a CI/CD artifact. -
Reinstall from the new branch: Run now-sdk install --reinstall against the development instance.
-
Reimport the data with the sys_id preserved: Call
POST /api/now/table/<table>for each exported row, passing the original sys_id so that references to that data continue to resolve. Insert parent tables before child tables where reference fields depend on them.
Constraints
-
This procedure works only if the new branch still defines the table that the data belongs to. If it does not, the data has no destination. Identify this data explicitly rather than discarding it.
-
This procedure requires the development service account to permit setting sys_id explicitly on insert. Confirm this permission on the instance before relying on it. The development admin role described in Appendix A1 includes this permission; a custom role might require it to be added explicitly.
-
This is a manual operation performed on demand, not part of the automated per-change pipeline. Implement it as a separate, manually triggered pipeline job (for example a GitHub Actions workflow_dispatch job, a GitLab manual job, an Azure DevOps manual trigger, or a parameterized Jenkins job) that accepts the list of tables to preserve as input.
APPENDIX C – Development Patterns
This section summarizes the patterns from this whitepaper in a quick-reference format.
Developing a new app on the ServiceNow platform
-
Set up a sandbox to ensure an isolated development environment.
-
Create with Build Agent, which will write your app with Fluent objects.
-
Use ATF Test Runner within Build Agent to create and run unit tests.
-
Push to Source Control via Build Agent.
-
Publish to the App Repo.
-
Use Release Ops to automate transport between instances and ensure the release process is followed.
Modifying existing apps on the ServiceNow platform
-
Set up a sandbox to ensure an isolated development environment.
-
Create a branch in source control via source control or Build Agent.
-
Pull into ServiceNow Studio from source control.
-
Build in a sandbox with ServiceNow Studio (with/without Build Agent).
-
Push to source control branch via ServiceNow Studio.
-
Merge to main on source control.
-
Pull source control main into ServiceNow Studio.
-
Publish to the App Repo.
-
Use Release Ops to automate transport between instances and ensure the release process is followed.
Developing a new app via the ServiceNow SDK
-
Set up a sandbox to ensure an isolated development environment.
-
Use ServiceNow SDK to create objects in Fluent.
-
Run ATFs from the SDK (requires 4.10.0).
-
Build and install from the SDK onto the sandbox.
-
Push to source control.
-
Pull source control main into ServiceNow Studio.
-
Publish to the App Repo.
-
Use Release Ops to automate transport between instances and ensure the release process is followed.
Modify app + SDK (incomplete)
-
Set up a sandbox to ensure an isolated development environment.
-
Pull from source control.
-
Use ServiceNow SDK to create objects in Fluent.
-
Run Automated Test Framework (ATF) tests from the SDK (requires 4.10.0).
-
Push to source control.
-
Merge to main on source control.
-
Pull from main on a sandbox from ServiceNow Studio.
-
Publish to the App Repo.
-
Use Release Ops to automate transport between instances and ensure the release process is followed.
Appendix D - AI skills
Custom AI skills are a way to extend Build Agent capabilities, guiding it towards your team's preferred patterns and standards. A skill bundles a set of instructions, and optional reference files, that Build Agent loads when a relevant task begins.
In the ServiceNow IDE, you can configure a custom skill at the workspace level, one skill per workspace. To make a skill available instance-wide, or to use it from ServiceNow Studio, add the skill definition to the sn_build_agent_skill table on your instance, and any supporting reference file content to sn_build_agent_skill_resource.
Notes:
-
A custom skill whose name matches an out-of-the-box (OOB) skill will override the OOB version. This practice is intentional and useful for customization, but you should be aware of it.
-
Keep skill descriptions distinct. When multiple custom skills, or a custom skill and an OOB skill, have overlapping descriptions, the model can pick the wrong one. Crisp, non-overlapping descriptions work better to prevent misrouting.