SyGra Studio
Visual workflow builder and execution platform for SyGra synthetic data pipelines
Why This Exists
SyGra is a graph-oriented framework for building synthetic data generation pipelines using LLMs. While powerful, creating and debugging YAML-based workflow configurations requires deep familiarity with the schema and manual iteration.
SyGra Studio provides: - A visual drag-and-drop interface for designing workflows - Real-time execution monitoring with node-level progress - Integrated code editing with syntax highlighting - Data source preview and transformation testing - Model management across multiple LLM providers
It replaces the manual YAML editing workflow with an interactive builder while maintaining full compatibility with the SyGra framework.
Quickstart
Using Make (Recommended)
# From repo root - one command does everything
make studio
This automatically builds the frontend (if needed) and starts the server at http://localhost:8000.
Manual Setup
# 2. Build the frontend
cd studio/frontend
npm install
npm run build
cd ../..

# 3. Start the server
uv run python -m studio.server --tasks-dir ./tasks/examples --svelte

# 4. Open browser
# Navigate to http://localhost:8000
Verification: You should see the SyGra Studio interface with a sidebar listing available workflows from tasks/examples/.
Features
| Feature | Description |
|---|---|
| Visual Graph Builder | Drag-and-drop workflow creation with 12+ node types |
| Multi-LLM Support | Azure OpenAI, OpenAI, Ollama, vLLM, Mistral, Vertex AI, Bedrock |
| Real-time Execution | Live node status, logs, and output streaming |
| Code Editor | Monaco-based Python/YAML editing with syntax highlighting |
| Data Preview | Sample data loading with transformation preview |
| Structured Outputs | JSON schema validation for LLM responses |
| Nested Workflows | Subgraph support for modular workflow composition |
| Execution History | Full run tracking with comparison and analytics |
| Export | Generate production-ready YAML and Python code |
Non-Goals
- Production job scheduler
- Multi-tenant platform
- Model training
- Distributed execution
Installation
Requirements
| Component | Version | Notes |
|---|---|---|
| Python | 3.9, 3.10, 3.11 | 3.9.7 excluded due to bug |
| Node.js | 18+ | For frontend build |
| npm | 9+ | Package manager |
Install from Source
# Clone repository
git clone https://github.com/ServiceNow/SyGra.git
cd SyGra

# Install Python dependencies
pip install -e .

# Build frontend
cd studio/frontend
npm install
npm run build
cd ../..
Verify Installation
python -c "from studio import create_server; print('OK')"
Configuration
Environment Variables
Studio uses environment variables for model credentials and settings. Variables are stored in studio/.env and can be managed via the Settings UI.
Model Credentials
Model credentials follow the pattern SYGRA_{MODEL_NAME}_{URL|TOKEN}:
# Azure OpenAI
SYGRA_GPT-4O_URL=https://your-resource.openai.azure.com/
SYGRA_GPT-4O_TOKEN=your-api-key

# vLLM / Self-hosted
SYGRA_LLAMA_3_1_8B_URL=http://localhost:8001/v1
SYGRA_LLAMA_3_1_8B_TOKEN=your-token

# Ollama (local)
SYGRA_QWEN3_URL=http://localhost:11434
Custom Models
Add models to studio/config/custom_models.yaml:
my_custom_model:
  type: azure_openai
  model_name: gpt-4o
  deployment_name: my-deployment
  api_version: "2024-02-15-preview"
  parameters:
    temperature: 0.7
    max_tokens: 4096
Usage
Make Commands (Recommended)
The project includes a Makefile with convenient commands for Studio. Run from the repository root:
| Command | Description |
|---|---|
make studio |
Build frontend (if needed) and start server |
make studio-build |
Build frontend only (skips if already built) |
make studio-rebuild |
Force rebuild frontend |
make studio-dev |
Print instructions for development mode |
make studio-clean |
Remove frontend build artifacts and node_modules |
Configuration via environment variables:
# Custom tasks directory and port
make studio TASKS_DIR=./my/tasks PORT=9000

# Default values
# TASKS_DIR=./tasks/examples
# PORT=8000
CLI Reference
python -m studio.server [OPTIONS]
| Flag | Short | Default | Description |
|---|---|---|---|
--tasks-dir |
-t |
None |
Directory containing workflow tasks |
--host |
-H |
0.0.0.0 |
Host to bind |
--port |
-p |
8000 |
Port to listen on |
--reload |
-r |
false |
Auto-reload on code changes |
--log-level |
-l |
info |
Logging level (debug/info/warning/error) |
--svelte |
-s |
false |
Use Svelte UI (requires build) |
Examples
# Development with auto-reload
python -m studio.server -t ./tasks/examples --reload --svelte

# Production
python -m studio.server -t /opt/sygra/tasks -p 8080 --svelte

# Custom host binding
python -m studio.server -H 127.0.0.1 -p 3000 --svelte
Programmatic Usage
from studio import run_server, create_app

# Simple: run blocking server
run_server(tasks_dir="./tasks", port=8000, use_svelte_ui=True)

# Advanced: get FastAPI app for custom middleware
app = create_app(tasks_dir="./tasks")
# Add custom routes, middleware, etc.
API Reference
Workflow Endpoints
| Method | Endpoint | Description |
|---|---|---|
GET |
/api/workflows |
List all workflows |
GET |
/api/workflows/{id} |
Get workflow graph |
POST |
/api/workflows |
Create workflow |
PUT |
/api/workflows/{id} |
Update workflow |
DELETE |
/api/workflows/{id} |
Delete workflow |
GET |
/api/workflows/{id}/yaml |
Export as YAML |
PUT |
/api/workflows/{id}/nodes/{node_id} |
Update node |
DELETE |
/api/workflows/{id}/nodes/{node_id} |
Delete node |
POST |
/api/workflows/{id}/edges |
Add edge |
DELETE |
/api/workflows/{id}/edges/{edge_id} |
Delete edge |
Execution Endpoints
| Method | Endpoint | Description |
|---|---|---|
POST |
/api/workflows/{id}/execute |
Start execution |
GET |
/api/executions |
List executions (paginated) |
GET |
/api/executions/{id} |
Get execution status |
POST |
/api/executions/{id}/cancel |
Cancel execution |
DELETE |
/api/executions/{id} |
Delete execution record |
Model Endpoints
| Method | Endpoint | Description |
|---|---|---|
GET |
/api/models |
List configured models |
POST |
/api/models/{name}/ping |
Health check model |
POST |
/api/models/ping-all |
Health check all models |
Execute Workflow Example
curl -X POST http://localhost:8000/api/workflows/my_workflow/execute \
  -H "Content-Type: application/json" \
  -d '{
    "input_data": [{"question": "What is machine learning?"}],
    "num_records": 1,
    "batch_size": 25
  }'
Response:
{
  "execution_id": "exec_abc123",
  "status": "running",
  "message": "Execution started"
}
Poll Execution Status
curl http://localhost:8000/api/executions/exec_abc123
Response:
{
  "id": "exec_abc123",
  "workflow_id": "my_workflow",
  "status": "completed",
  "started_at": "2026-01-19T10:30:00Z",
  "completed_at": "2026-01-19T10:30:45Z",
  "duration_ms": 45000,
  "node_states": {
    "llm_1": {"status": "completed", "duration_ms": 2500}
  },
  "output_data": [{"response": "Machine learning is..."}]
}
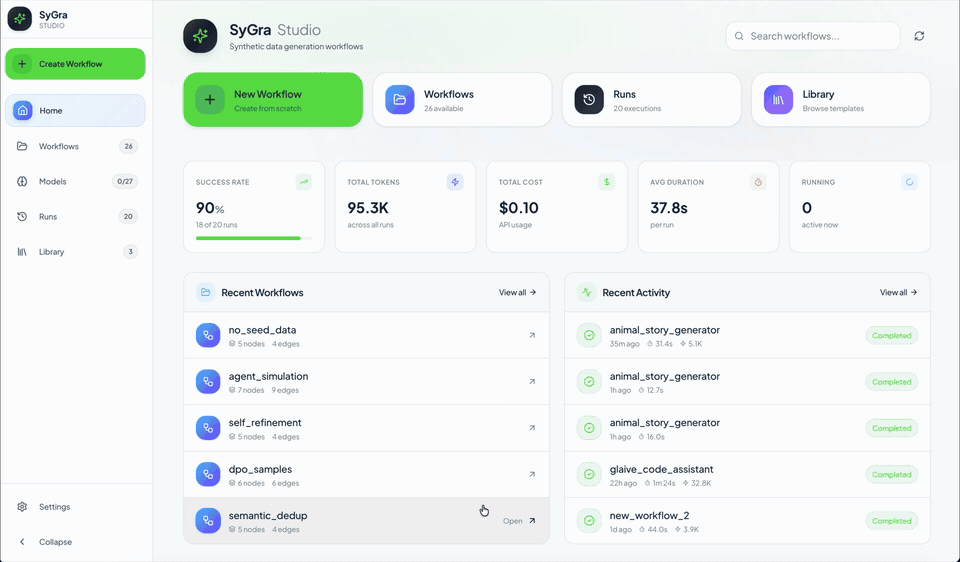
User Interface Overview
Home Dashboard
When you first open SyGra Studio, you'll see the Home Dashboard with:
- Quick Actions: Create new workflow, browse workflows, view runs, access template library
- Stats Overview: Success rate, total tokens used, total cost, average duration, running executions
- Recent Workflows: Quick access to your most recent workflows
- Recent Activity: Latest execution runs with status indicators
Sidebar Navigation
The sidebar provides navigation to all major sections:
| Section | Description |
|---|---|
| Home | Dashboard with stats and quick actions |
| Workflows | Browse and manage all workflows |
| Models | Configure and test LLM connections |
| Runs | View execution history and analytics |
| Library | Browse workflow templates |
The sidebar also shows a badge indicating the number of currently running executions.
Creating a Workflow
Step 1: Start a New Workflow
- Click the "+ Create Workflow" button in the sidebar (or on the Home dashboard)
- The visual Workflow Builder opens with a blank canvas
- Your workflow auto-saves to local storage as you work (key:
sygra_workflow_draft)
Step 2: Understanding the Builder Interface
The Workflow Builder has several key areas:
| Area | Description |
|---|---|
| Canvas | Main drag-and-drop area for building your workflow graph |
| Node Palette | Panel on the left with available node types to drag onto canvas |
| Toolbar | Top bar with Undo/Redo, Save, Run, and layout controls |
| Details Panel | Right panel showing configuration for the selected node |
| Minimap | Small overview of your workflow (bottom-right) |
Step 3: Add Nodes to Your Workflow
Available Node Types:
| Node Type | Icon | Purpose |
|---|---|---|
| Data | Database | Load input data from HuggingFace, local files, or ServiceNow |
| LLM | Bot | Call a language model with prompts |
| Agent | Bot (pink) | LLM with tool-calling capabilities |
| Lambda | Lightning | Run custom Python code |
| Branch | Git Branch | Conditional routing based on state |
| Connector | Link | Connect to external services |
| Subgraph | Boxes | Embed another workflow as a node |
| Output | Download | Define output generation and sinks |
| Multi-LLM | Compare | Run multiple LLMs and compare outputs |
| Web Agent | Globe | Browser automation with Playwright |
To add a node:
- Drag and drop: Drag a node type from the palette onto the canvas
- Double-click: Double-click on the canvas to open node type selector
- Context menu: Right-click on the canvas for options
Step 4: Connect Nodes
- Hover over a node to see its connection handles (small circles on edges)
- Click and drag from an output handle (right side) to an input handle (left side) of another node
- Release to create the connection (edge)
- To delete an edge, click on it to select, then press Delete or Backspace
Keyboard shortcuts:
| Shortcut | Action |
|---|---|
Ctrl/Cmd + Z |
Undo |
Ctrl/Cmd + Shift + Z |
Redo |
Ctrl/Cmd + S |
Save workflow |
Delete / Backspace |
Delete selected node or edge |
Escape |
Deselect / Close panel |
Step 5: Configure Node Details
Click on any node to open the Node Details Panel on the right:
Overview Tab
- Node ID: Unique identifier (auto-generated, editable)
- Summary: Display name shown on the node
- Description: Optional documentation
Prompt Tab (LLM/Agent nodes)
- Add System, User, or Assistant messages
- Use
{variable_name}syntax to reference state variables - Drag to reorder prompts
- Variable autocomplete shows available state variables from upstream nodes
Models Tab (Multi-LLM nodes)
- Add multiple model configurations
- Set temperature and max tokens per model
- Define post-processing logic
Tools Tab (LLM/Agent nodes)
- Add tool paths (Python functions)
- Set tool choice: Auto, Required, or None
- Browse available tools from the Tool Library
Code Tab (Lambda/Branch/Data/Output nodes)
- Monaco editor with Python syntax highlighting
- Pre-process and post-process hooks for execution nodes
- Transform functions for data nodes
- Output generator code for output nodes
Settings Tab
- Structured Output: Enable JSON schema validation
- Chat History: Enable conversation memory
- Output Keys: Define state variables to output
Step 6: Configure Data Sources
For Data nodes, configure where your input data comes from:
| Source Type | Configuration |
|---|---|
| HuggingFace | Repo ID, Config Name, Split |
| Local File | File path (CSV, JSON, JSONL, Parquet) |
| ServiceNow | Table name, Query filters |
Preview your data:
- Select the Data node
- In the Details Panel, find the data source section
- Click "Preview" to load sample records
- Verify columns and data format before running
Step 7: Save Your Workflow
- Click the "Save" button in the toolbar (or
Ctrl/Cmd + S) - If this is a new workflow, enter a workflow name (becomes the folder name)
- Choose a save location within your tasks directory
- Studio generates:
task.yaml- Workflow configurationtask_executor.py- Python code for custom functions
Running a Workflow
Step 1: Open the Run Dialog
From the Workflow Builder or Workflow detail view:
- Click the "▶ Run Workflow" button in the toolbar
- The Run Workflow Modal opens with configuration options
Step 2: Configure Execution Parameters
Basic Parameters
| Parameter | Description | Default |
|---|---|---|
| Number of Records | How many records to process from the data source | 10 |
| Start Index | Which record to start from (0-indexed) | 0 |
| Batch Size | Records processed in each batch | 25 |
| Run Name | Custom name for this execution (for tracking) | Auto-generated |
Advanced Options
Expand the "Advanced Options" section for additional settings:
| Option | Description |
|---|---|
| Debug Mode | Enable verbose logging |
| Resume | Resume from a previous checkpoint |
| Quality Mode | Enable quality checks and validation |
| Disable Metadata | Skip metadata collection (faster execution) |
| Checkpoint Interval | How often to save progress (records) |
| Custom Run Args | JSON object with additional parameters |
Step 3: Preview Input Data
Before running, you can preview the data that will be processed:
- Click "Show Preview" in the Run modal
- View sample records from your data source
- Verify the data looks correct
Step 4: Start Execution
- Click the "▶ Run Workflow" button in the modal
- The execution starts immediately
- You'll see the Execution Panel appear at the bottom of the screen
Step 5: Monitor Live Progress
The Execution Panel shows real-time progress:
- Status indicator: Running (blue pulse), Completed (green), Failed (red)
- Progress bar: Visual progress through nodes
- Current node: Which node is currently executing
- Duration: Elapsed time
- Logs: Expandable panel showing execution logs (click chevron to expand)
View Results:
When execution completes (or fails), click "View Results" to see: - Output data records - Execution logs - Error details (if failed)
Monitoring Workflows
Accessing the Runs View
- Click "Runs" in the sidebar
- The Runs List View shows all execution history
Runs List Features
Filtering and Search
| Filter | Options |
|---|---|
| Search | Search by workflow name or run ID |
| Status | All, Completed, Running, Failed, Cancelled, Pending |
| Workflow | Filter by specific workflow |
| Date | All Time, Today, Since Yesterday, Last 7 Days, Last 30 Days |
Sorting
Click column headers to sort by: - Workflow name - Status - Started time - Duration
Bulk Actions
- Use checkboxes to select multiple runs
- Available actions:
- Delete: Remove selected runs from history
- Compare: Compare metrics across selected runs (2+ runs)
View Modes
Toggle between three view modes using the icons in the top-right:
| Mode | Description |
|---|---|
| Table | Traditional list view with all runs |
| Analytics | Dashboard with charts and aggregate statistics |
| Compare | Side-by-side comparison of selected runs |
Run Details View
Click on any run to see detailed information:
Overview Tab
- Quick stats: Start time, duration, output records, run ID
- Node execution states: Status and duration for each node
- Error details: If the run failed, see the error message
Output Tab
- Sample records: View first 5 output records
- Copy All: Copy full output to clipboard
- Expandable records: Click to expand individual records
Logs Tab
- Full execution logs: Scrollable log viewer with line numbers
- Syntax highlighting: Different colors for log levels
Metadata Tab (for completed runs)
Rich analytics including:
- Cost breakdown: Total cost, cost per record
- Token usage: Prompt vs completion tokens, distribution chart
- Success rate: Records processed vs failed
- Request statistics: Total requests, failures
Interactive Charts: - Token distribution (donut chart) - Model token usage (stacked bar chart) - Node latency (horizontal bar chart with color coding)
Model Performance: - Per-model statistics (requests, latency, throughput, P95) - Latency distribution visualization
Node Statistics: - Table with execution count, average latency, tokens per node
Run Comparison
To compare multiple runs:
- Select 2 or more runs using checkboxes
- Click the Compare icon in the toolbar
- View side-by-side comparison:
- Status
- Duration
- Total tokens
- Cost
- Records processed
- Success rate
- Models used
- Per-model performance breakdown
Analytics Dashboard
Switch to Analytics view for aggregate insights:
- Run distribution: Pie chart by status
- Duration trends: Line chart over time
- Cost analysis: Breakdown by workflow
- Token usage patterns: Over time and by model
Common Workflows
Add an LLM Node
- Drag "LLM" node onto canvas
- In details panel:
- Set Summary (display name)
- Select Model from dropdown
- Add System and User prompts using
{variable}syntax - Set Output Key for the state variable to store the response
- Connect to previous/next nodes
Configure Structured Output
- Select an LLM node
- Go to Settings tab
- Enable "Structured Output"
- Choose schema mode:
- Inline: Define fields directly with name, type, description
- Class Path: Reference a Pydantic model (e.g.,
mymodule.schemas.MyOutput) - Set Fallback Strategy:
instruction: Add schema to prompt (more reliable)post_process: Validate after generation- Configure retry settings for parse errors
Create a Data Pipeline
- Add a Data node → connect to LLM node → connect to Output node
- Configure Data node with your source (HuggingFace, file, etc.)
- Configure LLM node with prompts referencing data columns:
{column_name} - Configure Output node with output mappings or generator code
- Save and run
Use Pre/Post Processors
For any execution node (LLM, Lambda, etc.):
- Select the node
- Go to Code tab
- Add Pre-processor: Modify state before node execution
- Add Post-processor: Transform the node's response
Example pre-processor:
class MyPreProcessor(NodePreProcessor):
    def apply(self, state: SygraState) -> SygraState:
        state["formatted_input"] = state["raw_input"].upper()
        return state
Group Nodes as Subgraph
- Select multiple nodes (Shift+click or drag to select)
- Click "Group as Subgraph" in the toolbar
- Enter a name for the subgraph
- The selected nodes become a single subgraph node
- Double-click the subgraph to edit its contents
Operational Guide
Execution Storage
Executions are stored in studio/.executions/:
.executions/
├── index.json          # Metadata index (loaded on startup)
└── runs/
    ├── exec_abc123.json
    ├── exec_def456.json
    └── ...
Index refresh: If the index becomes stale:
curl -X POST http://localhost:8000/api/executions/storage/refresh